Ever dreamed of a garden that practically takes care of itself while providing you with a full pantry of fruits, nuts, vegetables, and herbs? Sounds like magic, right? Well, it’s called food forest design, and it’s very real — as long as you’ve got a bit of planning, dirt under your nails, and patience for nature’s timeline.
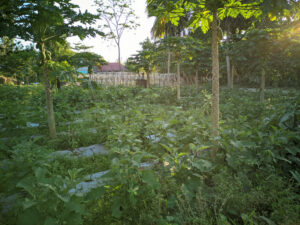
A food forest is essentially an edible ecosystem designed to mimic the way nature grows wild forest systems — with multiple layers of vegetation working together in harmony. It’s a gardening approach that merges sustainability with abundance, making it a favorite for permaculture enthusiasts, homesteaders, and anyone keen on turning their backyard into a thriving food supply.
But how do you actually design and implement your own food forest? This guide will walk you through each step, layer by layer, to help you create a lush, self-sustaining edible paradise.
What Exactly is a Food Forest?
To put it simply, a food forest is a garden designed to mimic the structure and function of a natural forest, but with more focus on edibles. Traditional forests generate their own fertility, retain water, and provide homes for a diverse range of creatures, all while growing without constant weeding, watering, or pest management. Now imagine this symphony of nature, except it’s tailored to grow apples, berries, herbs, and even potatoes. That’s a food forest.
These systems have been used for centuries worldwide. Just look at home gardens in Kerala, India, or ancient Mayan agroforestry setups. Old wisdom combined with modern methods = complete gardening gold.
The Benefits of Food Forests
Why bother with this dreamy setup? Well:
- Low Maintenance: Once established, food forests mostly take care of themselves. (Think about how often anyone has watered a forest.)
- Sustainability: Creates a self-sufficient ecosystem that builds soil, reduces waste, and sequesters carbon.
- Biodiversity Boost: With every layer supporting a variety of species, your garden becomes a haven for pollinators, birds, and beneficial insects.
- Food Security: A food forest can produce an incredible range of edibles, ensuring you’re never out of fresh produce.
Understanding Forest Layers
A food forest operates on seven main layers, each playing its part in this grand edible symphony. Curious? Here’s the breakdown:
1. Canopy Layer (Tall Trees, 30-50ft)
The stars of your forest! These are your primary fruit and nut trees, like apples, pecans, or walnuts. Make sure to plan placement carefully to manage sunlight and spacing — after all, not everyone gets VIP seating in the sunshine.
2. Sub-Canopy Layer (Smaller Trees, 15-30ft)
Ever heard the term “team player”? That’s the sub-canopy layer. Think dwarf fruit trees, multi-stemmed varieties, or nitrogen-fixing acacia trees. These work beautifully alongside the big guys, filling in gaps and providing support.
3. Shrub Layer (5-15ft)
Berries anyone? This layer is all about fruit-bearing shrubs (raspberries, elderberries) or nitrogen-fixing options for the soil. Bonus? They double as habitats for beneficial insects.
4. Herbaceous Layer
The show-offs that bring color, aroma, and yes, vegetables to your food forest. Culinary herbs like basil, medicinal plants like yarrow, and pollinator favorites like mint all fit here. Dynamic accumulators like comfrey also make an appearance, gathering nutrients and sending them back to the soil.
5. Ground Cover Layer
Cover your bases! Living mulches, edible spreaders like creeping thyme, and even soil-builders such as clover help hold and improve your soil.
6. Root Layer
This layer is all about what’s (literally) going on beneath the surface. Think tubers like sweet potatoes, carrots, or soil-improving root systems — these enhance nutrients underground and help avoid erosion.
7. Vine Layer
The final frontier! Vines like passionfruit or grapes make use of vertical spaces, growing alongside or over your support structures.
Design Considerations for Your Food Forest
Designing your food forest is all about preparation. It’s the unsexy part, but don’t skip it — the success of your edible oasis hinges on a thoughtful layout.
- Site Analysis & Climate Assessment: What’s your sun exposure? Soil type? Climate quirks? Know what you’re working with before you get started.
- Map the Sun & Water: Understand how light moves through your land, and plan for smart water flow (Swales? Rain-catching?) to support growth.
- Improve Your Soil: Feed your soil first, and it’ll feed you later. Test it, compost it, and don’t skip mulching.
- Paths & Spacing: Remember—you’ll need access to your garden. Plan paths so you aren’t trampling plants in Harvest Frenzy Mode. Edges are gold, so use them wisely.
Implementation Strategy
Here’s where the magic happens—planting your food forest! Start with:
- Site Prep: Get soil ready, set up irrigation, and make any necessary earthworks.
- Planting Timeline: Plant in layers, focusing on the canopy first, and work downward. Different plants thrive during different seasons, so keep an eye on your schedule.
- Support Systems: Mulch, water, protect, and repeat.
Maintenance + Harvest
Once your edible ecosystem is thriving, your workload lightens. Prune strategically, keep pests at bay by encouraging good bugs, and ensure your soil stays fertile. When harvest time arrives, grab a basket and marvel at nature’s abundance!
Troubleshooting Common Problems
Got issues? Address them early:
- If plants compete for light, trim back the canopy strategically.
- Root competition? Feed your soil to support all layers.
- Pests and diseases? Opt for natural, integrated pest management strategies.
Community & Education
Take it one step further by involving your friends and neighbors. Use your food forest as a teaching tool, or a way to swap produce within your community. Everyone wins!
A Long-Term Vision
A food forest isn’t a quick fix—it’s a decade (or more) commitment to creating an edible haven for you, your family, and future generations. But the payoff is worth every ounce of effort. You’ll gain food security, connect with nature, and watch your ecosystem thrive.
Example of a Permaculture Food Guild
- Canopy Layer: 3 apple trees, 1 peach tree, and a grape vine trellis
- Sub-Canopy Layer: Blueberry bushes and hazelnut shrubs
- Shrub Layer: Currant bushes, gooseberry bushes, and raspberry canes
- Herbaceous Layer: Comfrey, chives, oregano, thyme, mint, and other herbs
- Groundcover Layer: Strawberries or clover as a living mulch to suppress weeds
- Rhizosphere (Root) Layer: Carrots, beets, onions and garlic planted in the soil below the fruit trees to utilize nutrients
By incorporating these various layers into your food forest, you create a diverse and self-sustaining ecosystem that requires minimal maintenance. With time and patience, your food forest will continue to evolve and provide an abundance of fruits, vegetables, herbs, and more for you and your community to enjoy. So what are you waiting for? Get started on creating your own permaculture food forest today!
Conclusion
Next Steps
Don’t know where to begin? Grab a notebook, sketch your dream design, and then… get planting! You’ll make mistakes, sure—you’re human. But nature is forgiving, and before long, that sandy corner of your yard could become the lush, abundant garden of your dreams.
Want to dig deeper (pun intended)? Share your goals or gardening questions below, and join a community of sustainable growers who’d love to help! 🌱
