I love fermenting. The idea of eating living food in a world that is making us sick with processed food appeals to me. Unfortunately, I’ve had as many failures as successes. Fermenting dill pickles seemed easy enough in writing! Lucky for me I believe failures are opportunities to learn something and improve.
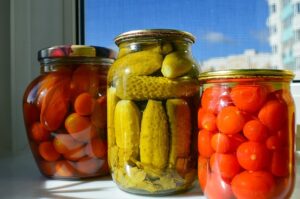
I had my first garden this year and because this is my retirement home and I am still working, I’ve had to be creative about things like water, pest control and harvest. Even so I managed to harvest cucumbers and cabbage. As any experienced gardener probably knows, cucumbers are prolific producers. I swear they can go from a flower to a pickle size cucumber in three days! So with an abundance of cucumbers I decided to try my hand at fermenting dill pickles.
Introduction
Fermenting dill pickles involves a few straightforward but important steps. First, you’ll need to start with fresh cucumbers, ideally picked from your garden or sourced from a local farmers’ market. After washing them thoroughly, you’ll prepare a brine solution, typically made with water and non-iodized salt. Next, I packed the cucumbers into a fermentation vessel, such as a mason jar, ensuring they were fully submerged in the brine to prevent exposure to air and mold growth.
Adding Spices
Adding spices and herbs like dill, garlic, and peppercorns can enhance the flavor of the pickles. Seal the jar with an airlock or a loose lid to allow gases to escape but keep contaminants out. Store the jar at room temperature and let the cucumbers ferment for about one to two weeks, tasting periodically until they reach your desired level of tanginess. Once they’re ready, refrigerate the pickles to slow down the fermentation process. Like I said, simple right? Well, it’s a learning curve.
Early Attempts: Lack of Crunchiness
One of the common failures in early attempts at fermenting dill pickles is ending up with soggy pickles instead of the desired crunchy texture. Possible causes can include:
Wrong Type of Cucumbers
Using the wrong type of cucumber can result in soggy pickles. Slicing cucumbers or cucumbers that have been waxed may not ferment properly. For the best results, it’s essential to use pickling cucumbers, which are smaller, firmer, and specifically bred for fermentation and pickling.
Parisian Cucumbers
I did fine here. I planted Parisian Pickling cucumbers and managed to get enough of the right size to fill a jar. Also, because I’m only able to be at my property every two weeks or so, had a bushel of big fat orange pickles I was told were good for nothing but the compost pile. Not true! I found a recipe for pickle chutney that made good use of those.
Incorrect Brine Concentration
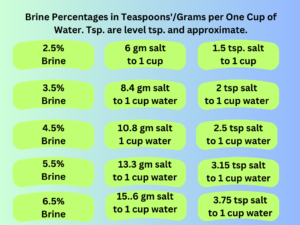
The concentration of salt in the brine solution is critical for achieving the right texture. Too little salt can lead to a lack of crunch and potential spoilage, while too much salt might inhibit the fermentation process altogether. A typical brine solution is made with 2 tablespoons of non-iodized salt per quart of water, which strikes a balance that encourages fermentation while preserving the cucumbers’ texture.
Here’s where I think I messed up. Instead of two tablespoon per quart of water I doubled that thinking more is better, right? No. That’s not the case. I think it ended up preventing the fermenting bacteria from getting a foot hold and I ended up with soggy pickles with a mat of green mold on top. Those ended up in the trash since I was back home and my compost pile 7 hours away.
Temperature Issues
The temperature at which the cucumbers ferment also plays a significant role. If the fermentation environment is too warm, the pickles can become mushy. Ideally, cucumbers should ferment at a consistent room temperature of around 65-75°F (18-24°C). Higher temperatures accelerate the fermentation process, which can lead to rapid texture changes, whereas cooler temperatures slow down fermentation but help maintain crunchiness.
Mold and Off Smells
Encountering mold during the dill pickle fermentation process can be disheartening, but understanding the causes and taking preventive measures can help ensure a successful batch. So here are the primary reasons for failure.
Causes and Prevention
- Insufficient Fermentation Environment
A primary cause of mold growth is an inadequate fermentation environment. It’s crucial to maintain a consistent room temperature between 65-75°F (18-24°C) and ensure the cucumbers are fully submerged in the brine. Any cucumbers or spices that are exposed to air can become breeding grounds for mold. Using weights to keep everything submerged can prevent this issue.
- Improperly Cleaned Jars
Sterilizing your jars before use is another critical step in preventing mold. Residual bacteria or contaminants from improperly cleaned jars can lead to unwanted mold and spoilage. Ensure that all jars, lids, and utensils are thoroughly washed and sanitized before starting the fermentation process. You can sterilize your jar in your water bath canner by boiling for 10 minutes. I also have a steam canner and it makes the process easier and has been approved by the USDA for high acid foods.
- Incorrect Salt-to-Water Ratio
The brine’s salt concentration is not just essential for texture but also acts as a safeguard against mold. Insufficient salt levels can fail to create an environment that promotes the growth of beneficial bacteria while inhibiting harmful ones. Adhering to the recommended ratio of 2 tablespoons of non-iodized salt per quart of water is key to preventing mold growth and ensuring a successful ferment.
Achieving Success: What Worked
Importance of Choosing Fresh and Firm Cucumbers
When it comes to pickling, the freshness and firmness of your cucumbers cannot be overstated. Fresh cucumbers ensure optimal texture and taste, eliminating any risk of mushy pickles. Firm cucumbers, harvested at their peak, are less likely to contain imperfections or soft spots, which can negatively affect the fermentation process. The success of your pickles largely depends on starting with the highest quality produce, as fresh cucumbers have less likelihood of harboring mold spores or bacteria that can spoil the batch.
Preferred Varieties for Pickling
Choosing the right variety of cucumber is also critical to achieving that perfect crunchy pickle. Some of the preferred varieties for pickling include:
- Kirby Cucumbers: Known for their small size and bumpy skin, Kirby cucumbers are a favorite among picklers for their crisp texture and ability to absorb flavors quickly.
- Boston Pickling Cucumbers: This heirloom variety is well-regarded for its thin skin and firm flesh, making it ideal for both dill and bread-and-butter pickles.
- Dill Cucumbers: Specifically bred for pickling, dill cucumbers have a consistent shape and size, which makes packing jars easier and ensures even fermentation.
By choosing the right cucumbers and keeping them fresh and firm, you set the foundation for a successful pickling process that yields delicious, crunchy pickles every time.
Perfecting the Brine
Adjusting the Salt-to-Water Ratio
Achieving the perfect salt-to-water ratio in your brine is essential for successful pickling. The right balance of salt not only preserves the cucumbers but also encourages the growth of beneficial bacteria, which is crucial for proper fermentation. A common starting point is a 5% brine solution, which consists of 5 tablespoons of salt per quart of water. I found this to be way too much salt. However, this ratio can be adjusted based on personal preference and specific recipes. Too little salt can result in soggy cucumbers and a lack of flavor, while too much salt can make the pickles overly salty and inhibit fermentation.
Experimenting with Different Spices and Herbs
Enhancing your pickles with a variety of spices and herbs can elevate their flavor profile and cater to different palates. Common spices used in pickling include mustard seeds, coriander seeds, dill seeds, black peppercorns, and red pepper flakes. Fresh herbs like dill, rosemary, and bay leaves can impart subtle, aromatic notes that complement the cucumbers’ natural taste. For a more complex flavor, consider adding garlic cloves, ginger slices, or even a hint of sweetener like honey or sugar. Experimenting with these ingredients allows you to create unique pickle recipes that stand out from the traditional varieties, making each batch an exciting culinary adventure.
Ideal Fermentation Conditions
Maintaining Consistent Temperatures
Temperature control is a critical factor in successful pickling. Fermentation occurs optimally between 60°F and 75°F (15°C to 24°C). Keeping the cucumbers at a consistent temperature within this range encourages the growth of beneficial bacteria while inhibiting the growth of undesirable microorganisms. Fluctuating temperatures can lead to inconsistent fermentation, affecting both the texture and flavor of your dill pickles. Monitoring the temperature regularly and adjusting the storage environment as needed can ensure a more reliable pickling process.
Importance of Keeping the Cucumbers Submerged
Ensuring that cucumbers remain fully submerged in the brine is essential to prevent spoilage and the growth of mold or yeast on the exposed parts. Submersion helps maintain an anaerobic environment, which is crucial for proper fermentation. Any cucumbers that rise above the brine can result in an off-taste and compromise the safety of the entire batch. Therefore, it’s important to regularly check that all cucumbers are beneath the liquid surface during the pickling process. You can make more brine if you need to top off your jars.
Using Weights or Fermentation Lids
To keep the cucumbers submerged, using weights or fermentation lids can be highly effective. Fermentation weights, often made of glass or ceramic, help hold the cucumbers down, ensuring they stay below the brine. Alternatively, specialized fermentation lids are designed to create a seal that maintains the anaerobic conditions inside the jar. These tools are handy for achieving consistent results and reducing the risk of spoilage. By incorporating weights or fermentation lids, you can have greater confidence in the success of your pickling endeavors.
Troubleshooting Common Issues
Soft Pickles
Remedies for Maintaining Crispness
To ensure your dill pickles remain crunchy, incorporating natural or commercial crisping agents can be beneficial. One traditional method is adding grape leaves to the brine. Grape leaves contain tannins, which help maintain the firmness of the cucumbers throughout the fermentation process. Simply adding a few grape leaves to each jar can significantly improve pickle texture. You can also use raspberry or blackberry leaves but watch out for thorns! People say bay leaves help as well.
Alternatively, you can use commercial pickle crisp products, which are formulated specifically to maintain or enhance the crispness of pickled vegetables. These products often contain calcium chloride, a common firming agent, and can be added directly to the brine according to the manufacturer’s instructions. By using grape leaves or a pickle crisp product, you can achieve that desirable crunch in every bite.
Cloudy Brine
Understanding Harmless Yeast vs. Harmful Bacteria
During the fermentation process, you may encounter some unintended substances like yeast or bacteria. It’s essential to differentiate between harmless yeast, such as Kahm yeast, and harmful bacteria, which can spoil your pickles and pose health risks. Kahm yeast appears as a thin, white, and powdery film on the surface of the brine. While it’s not harmful, it can detract from the flavor and appearance of your dill pickles. You can easily remove it by skimming off the surface. Conversely, harmful bacteria often result in foul odors, off colors, and an unpleasant taste, indicating that the batch should be discarded. By maintaining proper hygiene, monitoring the fermentation process, and using the right salt content, you’ll minimize the risk of harmful bacterial growth.
Ensuring Proper Salt Content
Salt is a critical component in the fermentation process, acting both as a flavor enhancer and a preservative. The correct salt concentration creates an environment that promotes the growth of beneficial lactic acid bacteria while inhibiting harmful bacteria. Generally, a salt concentration of 2-3% by weight of the vegetables is recommended. This is more math than I want to do! To keep it simple I am going to stick to 2 tablespoons per quart or water. I do use spring water since I have a well and have not put a filter on my house yet.
The Salt Dilemma
Too little salt can lead to soft, mushy pickles and an increased risk of spoilage, while too much salt can slow down the fermentation process and result in pickles that are too salty to enjoy. Measuring your ingredients accurately and dissolving the salt thoroughly in the brine can ensure a successful and safe batch of pickles. Using non-iodized salts, such as sea salt or pickling salt, is also crucial, as additives in iodized salt can negatively impact the pickling process.
Mold Management
Recognizing Safe vs. Unsafe Mold
Not all mold that appears during the pickling process is harmful, but it’s crucial to differentiate between safe and unsafe mold. Safe mold usually appears at the surface as white, blue, or blue-green spots and can easily be skimmed off. It doesn’t penetrate beyond the surface and doesn’t significantly impact the flavor or safety of the dill pickles. In contrast, unsafe mold often appears as black, red, or pink spots with a fuzzy texture and can be accompanied by unpleasant odors. This type of mold can penetrate deeper into the brine and spoil the entire batch. If you notice these signs, it’s best to discard the pickles to avoid any health risks.
Testing the Results
I could have skimmed off my mold mats but I had my husband taste a pickle and they did not taste good. He did not feel they tasted bad as in spoiled but they were soggy and way too salty. Don’t worry. It had no negative affect on hubby! I am not fond of dill pickles and not as brave as my husband! Besides he likes dill pickles. I figured there was no reason to take more chances though so out the whole jar went. It did make me sad though since my goal is to be more self-sufficient and eat more wholesome food I have grown myself.
Steps to Avoid and Address Mold in Future Batches
- Ensure Cleanliness:
Before starting the pickling process, clean and sanitize all utensils, containers, and surfaces. This step is foundational in preventing mold contamination.
- Maintain Proper Brine Levels:
I ensure that the vegetables are fully submerged in the brine, as exposure to air can promote mold growth. Using a weight to keep the vegetables submerged can be highly effective. You can also use a baggie filled with water.
- Check Salt Concentration:
Adhere to the recommended salt concentration of 2-3% by weight of vegetables. Proper salt levels help create an environment that is hospitable to beneficial bacteria but hostile to mold. Or just use 2 tablespoons per quart of water if your math-a-phobic like me! Also, there are calculators online you can use if you like.
- Cover Securely:
Use an airlock lid or a tightly sealed container to minimize exposure to oxygen while allowing gases produced during fermentation to escape. This helps reduce the risk of mold growth.
- Regular Inspection:
Inspect your ferment daily during the initial stages and then periodically after that. Skim off any surface mold promptly to prevent it from spreading. You may need to add brine after skimming.
- Control Temperature:
Store your fermenting pickles at a cool, consistent temperature. Ideally, this should be between 65-75°F (18-24°C) to prevent conditions conducive to mold growth.
By following these steps, you can minimize the occurrence of mold and ensure a healthy, delicious batch of pickles every time.
Finally, be aware ferments are not shelf-stable. I store my ferments in fridge once the fermenting is done. The cold will slow down but not stop the fermenting process
Conclusion
- Key Learning Points:
- Ensuring vegetables are fully submerged in brine.
- Maintaining proper salt concentration to foster beneficial bacteria.
- Using airtight containers to minimize oxygen exposure.
- Regular inspection and prompt removal of surface mold.
- Storing ferments at consistent, cool temperatures to inhibit mold growth.
I found the prospect of fermenting my own dill pickles daunting. However, I refused to let discouragement get the best of me and instead, I made the decision to give it a try. With a bit of patience and careful adherence to guidelines, I believe anyone can master the art of pickling. I hope. I’ll let you know how the next attempt goes!
Each batch offers a unique learning experience, and even small mistakes provide valuable lessons for future attempts. Embrace the process, experiment with different vegetables and recipes, and soon you’ll find joy in creating delicious, homemade pickles. The satisfaction that comes from enjoying your very own ferment creations is truly rewarding.