Learn how to grow kale at home. It’s easy just to plant the seeds in well-drained soil, basking in direct sunlight. Ensure healthy development by providing regular water and weekly doses of organic fertilizer. In just a few months, relish the delight of homegrown kale, fresh and vibrant!
Kale, a nutrient-dense leafy green, is renowned for its plethora of health benefits. Packed full of vitamins, minerals, and antioxidants, kale is a veritable powerhouse of nutrition, contributing to heart health, boosting the immune system, and even offering potential cancer-fighting properties. Beyond its nutritional prowess, kale is an excellent choice for home gardeners. Its robust nature and adaptability to different climatic conditions make it an easy-to-grow vegetable, providing a steady supply of fresh, organic produce right from your backyard.
Choosing the Right Variety of Kale
There are several varieties of kale, each with its unique characteristics and flavor profiles. The most common types include ‘Curly’, ‘Red Russian’, and ‘Lacinato’.
‘Curly’ kale is probably the variety you’ve seen most often in grocery stores. It has a vibrant green color and a slightly peppery taste. It’s extremely hardy and can withstand colder temperatures, making it a great choice for those living in cooler climates.
‘Red Russian’ kale, as the name suggests, has a distinctive reddish-purple hue. Its leaves are flat and fringed, and it has a sweeter, more delicate flavor than other varieties. It’s tolerant of both hot and cold climates, so it’s a versatile option for various growing conditions.
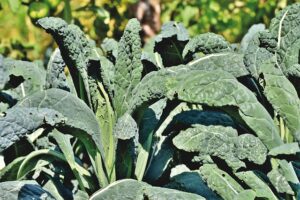
‘Lacinato’, also known as ‘dinosaur’ kale, is an Italian variety with dark blue-green, bumpy leaves. It has a slightly sweeter and more sophisticated flavor than ‘Curly’ and ‘Red Russian’. It prefers a cooler climate, but it can also tolerate slight heat.
When deciding which variety to grow, consider your taste preferences and your local climate. If you’re a fan of milder flavors, ‘Red Russian’ or ‘Lacinato’ might be a good fit. If you live in a colder region, ‘Curly’ kale’s cold tolerance could be beneficial. Remember, the beauty of growing your own kale is that it allows you to experiment and find the variety that suits your palate and environment best.
Preparing the Soil for Kale
Kale thrives in well-drained soil, rich in organic matter. A fertile garden bed ensures that kale plants have all the nutrients they need to grow lush and healthy. Incorporate well-rotted compost or manure into the soil before planting to boost its fertility. Also, a layer of mulch applied after planting helps to retain soil moisture and suppress weeds.
The soil pH is another crucial factor for kale’s success. Kale prefers slightly acidic to neutral soil, with a pH level between 6.0 and 7.0. A soil test can provide accurate information about your soil’s current pH, and if necessary, you can amend the soil to reach the desired pH level. Lime can be added to raise the pH (make it more alkaline), while sulfur can lower the pH (make it more acidic).
Lastly, while kale is a relatively tough plant, it does not like waterlogged conditions. Thus, ensuring good soil drainage is essential, especially if you live in a region with heavy rainfall. Raised beds or planting in mounds can aid in improving soil drainage, preventing the roots from being submerged in water and potentially developing diseases.
Planting the Seeds
- Timing: The ideal time to plant kale is from early spring to early summer for a summer harvest, and again in the fall for a winter harvest. However, keep in mind that kale is a cold-weather crop and will tolerate frost. It’s worthwhile to check your local planting calendar for the best dates.
- Depth: Plant the kale seeds at a depth of about 1/2 inch (1.27 centimeters). Planting at the correct depth allows the seeds to successfully germinate and establish a strong root system.
- Spacing: Kale plants require sufficient space to grow and flourish. Sow seeds approximately 3 inches (7.6 centimeters) apart in rows that are about 18 inches (45.72 centimeters) apart. This distance allows each plant ample room to mature, ensuring healthy growth and maximizing the yield.
- Watering: After planting, water the seeds thoroughly and keep the soil consistently moist until germination occurs. Too much or too little water can hinder germination, so aim for a balance.
- Germination: With proper planting and care, kale seeds typically germinate within 5-8 days. Once the seedlings have two true leaves, they can be thinned to a spacing of about 12 inches (30.48 centimeters) apart to allow for optimal growth.
Maintaining the Kale Plant
Watering
Kale plants prefer a consistently moist soil environment. It is recommended to water them deeply once or twice a week, depending on the weather conditions. Avoid overhead watering to reduce the risk of disease.
Weeding
Minimize weed competition for nutrients by regular weeding around your kale plants. Mulching can effectively suppress weed growth while also helping to retain soil moisture.
Fertilizing
Feed your kale plants with a balanced organic fertilizer every four to six weeks during the growing season for optimal productivity. Kale benefits from high nitrogen content in the soil, promoting lush, healthy leaves.
Pests and Diseases
Watch out for common pests like aphids, cabbage loopers, and cabbage worms. Utilize organic pest control methods such as introducing beneficial insects, manual removal, or using a gentle insecticidal soap. As for diseases, kale is susceptible to black rot, clubroot, and white rust. Practice crop rotation, and proper spacing, and avoid over-watering to discourage disease development. Prompt removal and disposal of infected plants can prevent the spread of disease.
Harvesting and Storing Kale
Harvesting Kale
Kale can be harvested as soon as the leaves are large enough to eat, usually when they are about the size of your hand. For the sweetest taste and most tender texture, it’s best to harvest kale after the first frost. To harvest, simply cut off the outer leaves about 1 to 2 inches above the ground, making sure not to damage the growing point at the center of the plant. This will encourage more growth for a continuous yield.
Storing and Preserving Kale
Freshly harvested kale can be stored in the refrigerator for about 1 to 2 weeks. To keep it fresh, rinse the leaves, pat them dry, and store them in a plastic bag with some paper towels to absorb excess moisture.
For longer preservation, kale can be frozen or canned. To freeze, blanch the leaves in boiling water for 2 minutes, then cool immediately in ice water. Drain the leaves, pat dry, and freeze them in a single layer on a baking sheet before transferring to freezer bags. This helps maintain the texture and flavor of the kale, and it can be used directly from the freezer in soups, stews, or smoothies.
Canning kale is another option, although it might alter the texture and flavor more than freezing. To can, blanch, cool, and drain the leaves as you would for freezing, then pack them into canning jars and cover with boiling water, leaving 1 inch of headspace. Process in a pressure canner according to your canner’s instructions. This preserved kale is perfect for adding to soups and stews in the winter months when fresh greens are less available.
Conclusion
Growing kale in your own garden not only gives you access to fresh, nutrient-dense greens but also offers the rewarding experience of nurturing a plant from seed to harvest. The whole process, while certainly demanding care and attention, provides a deep sense of satisfaction and a profound connection to nature. Moreover, each successful harvest can inspire further exploration into the wonderfully diverse world of gardening. Whether it’s trying new plant varieties, experimenting with different growing techniques, or simply expanding your garden, each step you take can lead to a more sustainable lifestyle and a deeper appreciation for the food we eat. So, let this experience with kale be just the beginning of your gardening journey. Happy growing!