Introduction
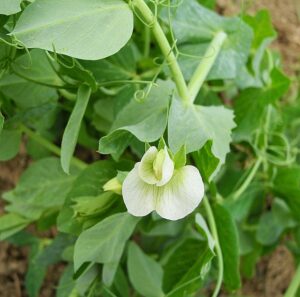
Peas are a cool-season crop, best suited to early spring or autumn sowing. They are a popular garden vegetable because of their taste and nutritional benefits. Pea are nitrogen fixing plants. They also make great companion plants. Learn how to grow peas in this detailed guide.
Cultivars
Several varieties of peas exist, each with unique characteristics. Here are a few common cultivars:
Green Arrow
The Green Arrow pea variety is widely recognized for its high yield and remarkable sweet taste. This cultivar is known for producing an abundance of two-pod clusters, each containing 8-11 peas. Gardeners often favor the Green Arrow for its hardiness, disease resistance, and the delightful sweet flavor that makes it a standout in any homegrown vegetable spread.
Lincoln
Lincoln peas are another popular cultivar, highly appreciated for their long harvest window that offers a flexible harvest period. Additionally, they are known for their strong resistance to wilt, making them a reliable option for home gardeners. These peas are sweet and tender, excellent for both freezing and eating fresh.
Wando
The Wando pea variety is an excellent choice if you’re planting later in the season. Unlike most pea varieties which prefer cooler weather, Wando is notably heat-tolerant. This cultivar is an excellent performer, producing plump pods filled with sweet, tender peas. Its ability to withstand warmer temperatures makes it a versatile choice for gardeners who may have missed the early spring sowing window.
Non-GMO Cultivars
If you’re looking for non-GMO pea cultivars, there are plenty of quality options to choose from. Here are a few non-GMO varieties recognized for their outstanding performance and flavor:
Sugar Snap
The Sugar Snap variety is a non-GMO cultivar known for its sweet flavor and high-yielding capacity. Its versatility in various dishes has made it a household favorite. Its high resistance to disease makes it an excellent choice for organic gardening.
Little Marvel
Little Marvel is a non-GMO cultivar famous for its sweet and tender peas. It’s particularly hardy in cooler climates and is known for its resistance to common pea diseases. This variety matures early, offering gardeners an early harvest of delicious, plump peas.
Progress No. 9
Progress No. 9 is a non-GMO variety favored for its short growing season and generous yields. This English pea variety is well suited for cooler climates and offers a sweet, distinct flavor that makes it popular for both fresh eating and canning. Its compact growth habit also makes it ideal for small gardens.
Planting Steps
Preparing the Soil
Peas thrive in well-drained soil with a pH range of 6.0 to 7.5. It’s essential to prepare the ground before planting, ideally, in the fall or early spring. Start by removing any weeds or stones and breaking up any large clumps of soil. Then, enrich the soil with organic material like well-rotted compost or aged manure. This enhances the soil’s fertility and improves its structure, promoting better root growth and nutrient absorption. If necessary, conduct a soil test to confirm its pH level. If the soil is overly acidic or alkaline, you can adjust it with lime or sulfur respectively. Remember, peas are light feeders and don’t require a lot of fertilizers. Over-fertilization can lead to lush foliage but poor pod production.
Sowing Seeds
Once the soil has been adequately prepared, it’s time to sow your seeds. Plant each seed 1-2 inches deep into the soil, ensuring that they are adequately covered but not buried too deep. The seeds should be spaced approximately 2-3 inches apart to allow for optimal growth and development. Keep in mind that each variety may have slight variances in sowing depth and spacing, so always refer to the specific planting instructions for each cultivar.
Watering
Water immediately after planting, and then regularly, ensuring the soil is consistently moist but not waterlogged. Peas prefer consistent moisture levels, particularly as they begin to flower and produce pods. Over-watering can lead to root rot and other diseases while under-watering can stress the plants and reduce yields. If possible, water in the morning to allow excess moisture to evaporate throughout the day, reducing the risk of disease. During dry spells, watering may be required more frequently. It’s important to check the soil moisture levels regularly and adjust watering accordingly. Remember, it’s better to water deeply and less frequently than to water lightly and often. This encourages the development of deep root systems, which helps plants to be more drought-resistant.
Staking
As pea plants mature, they may require support to keep them off the ground. A simple trellis or fence can provide ample support for most varieties. If you’re growing a climbing variety, a sturdier support structure may be needed.
Staking is a crucial step, particularly for taller pea varieties. It not only supports their growth but also makes harvesting significantly easier. To stake your pea plants, you can use a trellis, stakes, or a net. These should ideally be installed at the time of planting to avoid disturbing the growing roots later. For the most effective staking, place the stakes or trellis on the windward side so the plants can grow and lean onto them naturally. Remember, the purpose of staking is to support the plant in its natural habit, not to force it into an unnatural shape or direction. Always tie peas to stakes gently to avoid damaging the stem. This method will ensure a healthier crop and an easier harvest.
Weeding
Weeding is an important part of maintaining a healthy pea crop. Weeds can compete with the plants for resources and nutrients, resulting in stunted growth and reduced yields. It’s best to weed regularly, removing any competing plants as soon as they appear. Hand weeding is usually sufficient for small gardens. Be careful when using tools near pea plants, as their shallow roots can be easily damaged.
Mulching
Mulching is another important step in maintaining a healthy pea crop. It involves adding a layer of organic materials such as straw, leaves, or grass clippings on top of the soil around your plants. Mulch plays a crucial role in preserving soil moisture, suppressing weed growth, and maintaining optimal soil temperature. Over time, as mulch breaks down, it enriches the soil by providing valuable nutrients. Just be sure not to mulch too close to the base of your plants, as this can lead to rotting.
Pests and Diseases
Pea plants, like any other, are susceptible to a variety of pests and diseases. One of the most common pests you may encounter is aphids. These tiny insects can be identified by their green or black body and they tend to cluster on the undersides of leaves or on new growth. Aphids can be controlled by introducing natural predators, such as ladybird beetles, into your garden or using an organic insecticidal soap spray.
As for diseases, powdery mildew is a common culprit. It’s characterized by white, powdery spots on leaves and stems. Powdery mildew can spread quickly if the conditions are right, particularly in damp and humid environments. To manage this disease, consider using a fungicide or a homemade solution of baking soda and water. In future plantings, remember to space your pea plants adequately to promote air circulation and try to water the soil rather than the leaves, as wet leaves can encourage the growth of mold.
In both cases, early detection is key. Regularly inspect your plants for signs of distress and take action as soon as you notice any issues. This will help ensure a healthy and abundant harvest.
Harvesting
Harvesting is a crucial aspect of pea cultivation. To reap the maximum benefits, harvest the pods when they’re plump, generally occurring six to seven weeks after planting. Ensure to pick the pods gently to prevent causing any harm to the plant. Regular harvesting encourages the plant to continue producing, extending your harvest period. When pea pods are left to mature for too long on the plants, it can signal to the plant to stop flowering and producing new pods. Therefore, regular harvesting not only gives you a constant supply of fresh peas, but it also promotes continued production within the plant itself.
For the sweetest flavor, harvest in the morning after the dew has dried. Use two hands to pick the pods, one to hold the plant and the other to snap off the pod. This prevents damaging the vine, which can continue producing for several weeks if properly maintained.
After harvesting, if you don’t plan to eat the peas immediately, cool them as quickly as possible to preserve their sweet flavor. You can store them in the refrigerator for a few days or freeze them for longer storage.
If you wish to save seeds for the next planting season, leave some pods on the vine until they become brown and dry. These can be harvested, shelled, and stored in a cool, dry place until the next planting season.
Conclusion
With planning and care, growing your peas can be a rewarding experience. Enjoy the fruits of your labor in salads, soups and as a delightful side for your meals.


