How to Grow Potatoes
Growing potatoes can be a rewarding and enjoyable experience for any gardener, whether you’re a seasoned pro or just starting out. By following the tips and techniques in this article on how to grow potatoes, you can ensure a successful harvest of delicious and nutritious potatoes.
Choosing the Right Cultivar
The first step in successfully growing potatoes is to pick a cultivar that is appropriate for your growing zone. See the suggestions below but keep in mind these are just a few of the many possibilities.
- Zone 3-4: Recommended cultivar – ‘Adirondack Blue’
- Zone 5-6: Recommended cultivar – ‘Yukon Gold’
- Zone 7-8: Recommended cultivar – ‘Desiree’
- Zone 9-10: Recommended cultivar – ‘Red Pontiac’
Preparation of Seed Potatoes
Before planting, it’s crucial to prepare your seed potatoes to enhance germination and ensure a successful yield.
Use Certified Seed Potatoes
Always opt for certified seed potatoes from a reputable nursery or supplier. These are guaranteed to be disease-free, giving your crops the best start. Avoid using potatoes from grocery stores as these may carry diseases that can infect your soil and impact the health of your future crops.
Planting and Growing Process
Chitting or Sprouting Before Planting
Chitting, or sprouting, is a process of encouraging seed potatoes to sprout before planting. This process gives your crops a head start, particularly in colder climates. To chit your potatoes, place them in a cool, light, frost-free area (10C – 15C), in a single layer with the ‘eyes’ facing upwards. A process that takes 2-6 weeks, the seed potatoes are ready to be planted when the shoots are 1.5-2.5cm long.
Can potatoes be grown from seed?
Potatoes can technically be grown from seed, but it is not a common method for home gardeners as it takes longer and requires more attention. Growing from seed also increases the risk of disease and may produce inconsistent results in terms of yield and quality. It is recommended to stick with certified seed potatoes for the best chances of success. However, if you do choose to grow from seed, start by planting the seeds in a moist and warm environment (around 20°C). Once the plants have developed several leaves, they can be transplanted into your garden bed.
Preparing Seed Potatoes for Planting
Before planting, it’s important to cut your seed potatoes into pieces with at least one or two eyes each. By following these steps, you can maximize the number of plants and enhance your overall yield. Additionally, it is advisable to let the cut pieces dry out for a few days before planting to minimize the risk of rotting.It is recommended to use a sharp, clean knife and make sure each piece has at least 3-4 healthy eyes.
Soil Preparation for Planting Potatoes
The quality of soil in which potatoes are planted plays a pivotal role in the growth and yield of the crop. It’s vital to choose a well-drained, loose soil because potatoes need adequate moisture but cannot tolerate waterlogged conditions. Excess water can lead to the development of diseases like potato blight or rot.
Loose soil not only facilitates the easy penetration of roots but also allows the tubers to expand without restriction. Hard, compacted soil can limit tuber growth and reduce the overall yield.
The ideal soil pH for potatoes is slightly acidic, ranging between 5.0 and 6.0. A pH within this range helps prevent common potato diseases and ensures optimal nutrient uptake.
Potatoes are heavy feeders, requiring soils rich in fertility. It’s recommended to supplement your soil with well-rotted compost or manure several weeks before planting. This organic matter will provide an array of essential nutrients, enhancing the fertility of the soil and promoting healthier, more productive plants.
Planting, Depth, and Spacing of Seed Potatoes
When planting your prepared potato seeds, the correct depth and spacing are essential for healthy growth and optimum yield. Typically, seed potatoes should be planted about 3 to 4 inches deep in the soil. The holes or trenches should be spaced at least 12 inches apart to give the plants ample room for growth. In the case of row planting, leave a distance of about 30 inches between each row. This ensures each plant receives adequate nutrients from the soil and enough sunlight.
Importance of Row Direction and Sunlight
The direction of your potato rows can significantly impact the growth of your plants. It’s generally recommended to align your rows from north to south. This orientation allows your plants to receive the maximum amount of sunlight throughout the day, as the sun moves from east to west. Adequate exposure to sunlight is crucial for photosynthesis, the process by which plants convert sunlight into energy for growth. Inadequate sunlight can stunt growth and reduce yield. Ensure your garden site is positioned in an area that is exposed to full sun for the best results with your potato crop.
Care and Maintenance of Potato Plants
Potato plants require careful attention and maintenance to ensure a healthy crop. An essential part of the care involves a proper watering schedule. Typically, potato plants need about 1 to 2 inches of water per week. However, this can vary based on weather conditions and soil type. Sandy soils tend to drain quickly and may require more frequent watering compared to clay soils which retain water longer. During hot, dry spells, it may be necessary to water your plants more often to prevent the soil from drying out.
Fertilizer needs of potato plants are also an important consideration. While the initial addition of compost or manure provides a good start, your plants may benefit from a balanced fertilizer applied a few weeks after planting. This can help replenish nutrients in the soil and promote vigorous growth. It’s best to apply fertilizers early in the morning or late in the evening to reduce the risk of burning the plants.
Lastly, pest and disease management strategies are crucial for a successful harvest. Regularly inspect your plants for signs of pests such as Colorado potato beetles or aphids, and diseases like blight or scab. If detected early, many of these issues can be managed with organic controls like insecticidal soaps or copper sprays. Maintaining a clean garden, practicing crop rotation, and choosing disease-resistant varieties can also help in preventing disease outbreaks.
Do potatoes need to be pruned?
No, potato plants do not need to be pruned. Pruning can harm the plant and reduce your harvest. It’s best to allow the plants to grow freely and naturally.
What does it mean to “mound” your potatoes?
Mounding refers to the practice of piling soil or mulch around the base of potato plants as they grow. This helps protect the developing tubers from sunlight, which can cause them to turn green and become toxic. Mounding also encourages more tuber formation and can help increase yields. To mound your potatoes, simply use a hoe or shovel to create a small hill of soil or mulch around the base of each plant. This can be done once or twice during the growing season, depending on how tall your plants are getting. Be sure to leave some leaves and stems exposed so they can continue to photosynthesize and support tuber growth.
Can potatoes be grown in containers?
Yes, potatoes can be successfully grown in containers such as large pots or grow bags. This is a great option for those with limited space or poor soil conditions. When growing potatoes in containers, it’s important to choose a variety that is suitable for container gardening and provide adequate drainage and moisture levels. Start by filling the container about 1/3 of the way with potting soil, place your seed potatoes on top, and cover them with another few inches of soil. As the plants grow, continue adding more soil until the container is full. Harvesting in containers can be a bit tricky, but gently digging around the base of the plant should reveal your potatoes when they are ready to be harvested. Additionally, make sure to keep an eye on moisture levels and provide regular fertilization for optimal growth.
Are there any tips for growing potatoes in a garden?
Yes, several tips can help ensure success when growing potatoes in a garden. First, choose a sunny location with well-draining soil. Potatoes thrive in loose, loamy soil that is rich in organic matter. It’s also important to rotate your potato crops each year to prevent the buildup of diseases and pests in the soil. When planting, make sure to space your plants about 12 inches apart and plant them at a depth of 4-6 inches. As the plants grow, hilling – or adding soil around the base of the plant – can help increase tuber production. This can be done every few weeks until the plants reach maturity. Additionally, preventing weeds is crucial for optimal potato growth, as they can compete for nutrients and space. Regularly removing weeds and mulching around the plants can help keep them under control. Lastly, make sure to harvest your potatoes when they are mature but before the first frost, as cold temperatures can damage or kill the tubers. This article belongs to piney river homestead published 10-25-23
Common Potatoe Pest and Diseases
Potatoes, despite their hardy nature, can be susceptible to a variety of pests and diseases. Among the most common pests are the Colorado potato beetle, which can cause significant defoliation, and aphids, which can transmit harmful viruses to the plants. Wireworms and cutworms are also known to cause direct damage by feeding on the tubers.
In terms of diseases, late blight is a notorious threat that can cause severe damage and crop loss. This disease is caused by a type of fungi that thrives in damp, cool conditions. Early blight, though less severe, can still impact yield and is characterized by dark spots on the leaves. Another common disease is scab, which causes unsightly lesions on the tubers but doesn’t affect the flavor or edibility.
Remember, the best way to manage these threats is through prevention techniques such as crop rotation, using disease-free seed potatoes, maintaining a balanced soil pH, and regular monitoring for signs of pests and disease.
Organic methods to treat each of these pest and diseases include using natural predators like ladybugs to control aphids, applying neem oil or diatomaceous earth to deter beetles, and planting resistant potato varieties. For late blight prevention, proper ventilation of the plants and removing infected plant parts can be effective. Crop rotation is also crucial for reducing the buildup of soil-borne diseases.
Troubleshooting Common Potato Problems
Sometimes, despite our best efforts, potatoes can show signs of stress or disease. Here are a few common symptoms and possible causes:
- Yellowing leaves and stunted growth: This could be a sign of nutrient deficiency. Potatoes require a balanced diet of nutrients, including nitrogen, phosphorus, and potassium. A lack of these nutrients can lead to yellowing leaves and stunted growth. Consider testing your soil and applying a suitable fertilizer to correct any imbalances.
- Holes in potatoes: If you’re finding holes in your potatoes, the likely culprit is the potato beetle. These pests can bore into the tubers, causing visible damage. Consider introducing natural predators, such as ladybugs, or apply an organic repellent like neem oil to deter these pests.
- Brown spots on leaves: Brown spots could indicate the presence of blight or a fungal disease. These diseases thrive in damp, cool conditions and can cause significant damage if left untreated. To manage this, ensure proper ventilation of the plants, remove any diseased foliage, and consider applying a fungicide if necessary. Remember, prevention is always better than treatment, so employing techniques like crop rotation, using disease-resistant varieties, and maintaining a healthy soil environment are crucial.
In all cases, regularly monitoring your plants and acting quickly at the first sign of trouble can mitigate damage and ensure a healthy, bountiful harvest.
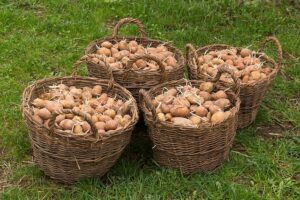
Harvesting Your Potatoes
It’s essential to know when your potatoes are ready for harvest. Typically, early varieties can be harvested 90-100 days after planting, when the tops of the plants turn yellow and start to die. For main crop varieties, wait until the foliage has completely died back. The skin of mature potatoes should be thick and firmly attached to the flesh. Harvesting too early may result in smaller potatoes while waiting too long can make them more susceptible to disease.
When harvesting, use a fork rather than a spade to prevent accidentally cutting into the tubers. Start by loosening the soil around the plant, then lift the plant and remove the potatoes. Be gentle to avoid bruising the potatoes, as this can lead to spoilage.
Storing and Curing Your Potatoes
After harvesting, potatoes should be cured to close up any small cuts and thicken the skin, which can reduce the risk of decay during storage. To cure your potatoes, spread them out in a cool, dark place (around 50-60 degrees Fahrenheit) with good ventilation for about 10-14 days.
Once the potatoes are cured, store them in a dark, cool, and humid environment, such as a root cellar. It’s important to store potatoes away from apples and onions, as these produce gases that can spoil potatoes. Check your stored potatoes regularly, removing any that show signs of spoilage to prevent it from spreading to other potatoes. Proper curing and storage methods can help ensure a long shelf life for your harvested potatoes, allowing you to enjoy them for months to come.
Extended Growing Season Techniques
Using Hoop Houses or Row Covers
To extend the growing season of potatoes, growers may use hoop houses or row covers. These structures, often made of plastic or protective fabric, create a microclimate that offers protection from harsh weather conditions, enabling the plants to continue growing in otherwise unfavorable conditions. They effectively capture solar heat, maintaining a warmer, more stable temperature and humidity level inside. This can allow for earlier planting in the spring and extended harvesting into the fall or winter.
Planting a Second Crop in Late Summer
Another technique to extend the potato growing season is to plant a second crop in late summer for a fall harvest. This method takes advantage of the warm soil temperatures in late summer, which can promote rapid tuber initiation and growth. The second crop is planted in the same way as the main crop, but the timing is adjusted so that the potatoes mature with the cooler temperatures of fall. This late-season planting can result in a significant boost in the year’s total yield and provides fresh potatoes later into the year. It’s important to note, however, that the success of a late summer planting can be dependent on the specific location and weather conditions of the growing season.
Conclusion
Growing potatoes can be a rewarding experience, especially when you follow these detailed steps to ensure success. Remember to choose the right cultivar for your climate, properly prepare your seed potatoes, and provide proper care and maintenance throughout the growing season. With a little patience and diligence, you will soon be enjoying delicious homegrown potatoes straight from your garden! Happy gardening.
For info on how to grow asparagus click here.