Vinegar has been around for centuries and is one of the oldest condiments known to man. It was a staple in ancient Rome, where it was used to flavor food and preserve it. Today, vinegar is still used in cooking, pickling, and cleaning due to its acidic nature that kills bacteria. It’s also gaining popularity amongst health-conscious individuals who are looking for a natural way to improve their overall wellness.
In this article, we’ll learn how to make vinegar at home. We’ll explain the ingredients and tools required, discuss the fermentation and acidification processes, and provide tips on how to properly store your finished product. By the end, you should have all the knowledge you need to begin making your vinegar!
Why Make Your Own Vinegar
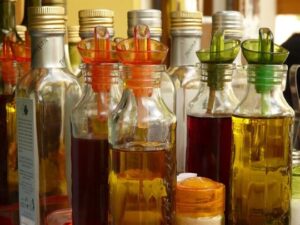
Most people have only been exposed to the distilled white vinegar and perhaps apple cider vinegar available in stores. There is a whole world of complex flavors to be experienced beyond these two vinegars.
Each alcohol base you use will have different characteristics and flavor profiles. The flavorings you can add are endless as well. Consider rose petal vinegar, or blueberry vinegar. Also, vinegar is a fermented food with all the wonderful benefits of fermented foods only vinegar tends to be high in prebiotics which is essentially the food probiotics eat. Prebiotics and probiotics both help gut health.
Ingredients and Tools
When it comes to making homemade vinegar, there are a few key ingredients and tools that are necessary for success. The most important ingredient is an alcoholic base such as wine, beer, cider, or mead. You’ll also need a starter or “mother”, which can be purchased online or from your local health food store. This is essentially a collection of natural bacteria that will help to initiate the fermentation process.
In terms of tools, you’ll need some basic kitchen equipment such as a pot for boiling, measuring cups and spoons, stirring utensils, and a strainer. It’s also recommended that you have some jars or bottles on hand with fermenting tops and some for storing your finished product.
Making Your Own Mother of Vinegar
While you can buy a pre-made vinegar mother, making your own can be a rewarding part of the process. To start, you’ll need some unpasteurized vinegar that contains live cultures. Raw apple cider vinegar is a popular choice. Mix equal parts of this vinegar and the alcoholic base of your choice (wine, beer, cider, or mead) in a glass or ceramic container.
Cover the container with a cloth to keep out insects and dust but allow air to circulate. Store the container in a dark, room-temperature location for 2-4 weeks. During this time, you should notice a gelatinous layer forming at the top — this is your vinegar mother.
Once you have this mother, you can use it to make vinegar repeatedly. Just remember, always handle the mother with clean hands or utensils to prevent unwanted bacteria from disrupting the process.
Maintaining Your Vinegar Mother
Maintaining your vinegar mother is crucial for continued vinegar production. Once you’ve made it, store the mother in a jar with a bit of the vinegar it produced. This acidic environment helps to preserve the mother and keeps it healthy.
When not in use, seal the jar and store it in a cool, dark place. It’s important to note, the mother doesn’t need to be fed with alcohol like a sourdough starter, but if you’re not using it for a long time, refresh it every few months with a little wine or cider to keep it healthy.
If you notice mold or a foul smell, discard the mother as this indicates contamination. Always remember to use clean, non-metal utensils when handling your mother to prevent introducing harmful bacteria or causing a negative reaction with the vinegar. With proper care, your vinegar mother can last indefinitely, providing you a steady supply of homemade vinegar.
Making Vinegar without a Mother
You can make vinegar without a vinegar mother. In this case, you will need unpasteurized vinegar such as raw apple cider vinegar 3 1/4 cups per gallon to start your fermenting process.
The Role of Alcohol by Volume Ratio in Vinegar Making
The Alcohol By Volume (ABV) ratio plays a significant role in vinegar making. It refers to the volume percentage of ethanol present in the total volume of liquid. For vinegar production, an optimal ABV range is crucial to ensure the effective conversion of alcohol into acetic acid by acetic acid bacteria. Typically, a starting ABV ratio of 5-9% is recommended. If the concentration is too high, it may inhibit the bacterial activity and slow down the fermentation process. Conversely, too low an ABV might not provide sufficient ethanol for conversion, leading to a weak vinegar. Therefore, maintaining an appropriate ABV ratio is key to producing a robust and flavorful homemade vinegar.
Adjusting the Alcohol By Volume (ABV) ratio in your vinegar-making process is not a difficult task, but it does require careful calculation and precision. If your starting alcohol content is too high, you can lower the ABV by diluting the mixture with unchlorinated water. On the other hand, if the alcohol content is too low, you can increase the ABV by adding more of your alcohol source, such as wine or cider. Always remember to mix thoroughly after any adjustment to ensure an even distribution of alcohol. It’s also crucial to measure your ABV accurately using a tool like a hydrometer or a refractometer. Remember, maintaining an appropriate ABV ratio is key to producing a robust and flavorful homemade vinegar.
The Fermentation Process
Once you have all the ingredients and tools ready to go, it’s time to begin the fermentation process. This is done by combining your alcoholic base with water and the starter culture, and then allowing it to sit in a warm spot for several weeks to months. During this time, the bacteria will convert the alcohol into acetic acid, which is the main component of vinegar. Your goal is a vinegar with 4% acid to be shelf-stable. Less than that and it may still taste wonderful but you will need to refrigerate. For food preservation vinegar needs to be 5%.
Introducing the Yeast
There are two primary methods to introduce yeast into your vinegar-making process: purchasing a commercial starter culture or cultivating a wild yeast culture.
Commercial starter cultures are readily available and typically comprise a specific strain of yeast, such as Saccharomyces cerevisiae. These commercial cultures are reliable, and consistent, and allow for a quicker start to the fermentation process. You can find them at brew shops, but even brewer yeast such as you make bread with will work.
Alternatively, cultivating your own wild yeast culture is a more organic approach. To do this add edible flower blossoms to pasteurized juice, cover with a paper towel and rubber band, then wait for the magic to happen. This method, while more time-consuming, can result in unique flavor profiles due to the variety of yeasts and bacteria present in the environment. However, it’s worth noting that the success of wild yeast cultivation can be influenced by many factors, including temperature, humidity, and cleanliness. You will no your starter is ready when it is bubbly and smells boozy.
Whether you choose a commercial starter or opt to cultivate a wild yeast culture, both methods will effectively kickstart the fermentation process and lead you on your journey to creating your own flavorful vinegar.
Once your starter is ready strain out the flowers or berries you used to introduce yeast and store in the fridge with a lid until ready to use.
Adding your Starter to your Alcohol Base
Acetic acid eats alcohol and in the process creates vinegar. Your alcohol base needs to be 5-9% alcohol by volume and nitrate-free. If your base alcohol has nitrates you can remove them by creating by stirring vigorously for an hour or perhaps more easily by adding food-grade hydrogen peroxide 1/2 tsp/gallon. Add your alcohol base and starter into a glass jar, cover the fermenting top and set in a warm dark place to ferment. If, like me, you like your house cool, you may need a warming jacket for your jars.
Acidification
While the fermentation process is important for producing acetic acid, it can take several weeks for the desired level of acidity to be reached. To speed up this process, you can add additional starter culture and allow the mixture to sit for an additional few days. Doing this will result in higher concentrations of acetic acid, and ultimately a more flavorful end product. Again, to be shelf stable you need 4% acid or more. To measure the acid level you will need a titration kit. Most brewing stores will see these.
Flavoring for your Homemade Vinegar
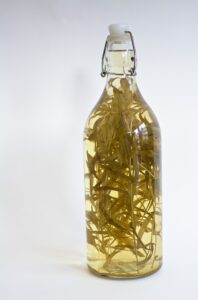
Once you have achieved the desired level of acidity, it’s time to add flavor to your vinegar. This can be done by adding herbs, spices, fruits, vegetables, or honey. The combinations are virtually limitless and you’ll only gain experience with trial and error.
Once you have the desired flavor, simply strain out any solids once again and your vinegar is ready to use. Enjoy!
Storage of Homemade Vinegar
Since vinegar is a shelf-stable product, it can be stored for a long period without going bad. To maximize the shelf life of your vinegar, make sure to store it in a dark place and keep the lid tightly sealed. This will help prevent any oxygen from getting into the bottle, which can cause your vinegar to spoil more quickly.
Uses for Vinegar
Vinegar has countless uses both in the kitchen and around the home. It can be used for cleaning surfaces, making salad dressings, and marinades, pickling and preserving food, growing bacteria cultures for science experiments, and even as a natural weed killer. The possibilities are truly endless!
Vinegar can also be used to make cocktail shrubs – a type of drink made with fruit and vinegar. This is a great way to add an acidic kick and unique flavor to your favorite cocktails. This article belongs to pineyriverhomestead.com published 9-10-23.
Conclusion
Learning how to make vinegar may seem complicated at first, but with the right techniques and ingredients, you can easily create homemade vinegar in just a few days. Once you have mastered this, you will be able to make endless flavor combinations and use it for a variety of different recipes and projects around the home. With a little practice, you will be able to make your own vinegar with ease. So why not give it a try? All you need is some time and patience, and you can soon be making deliciously flavored vinegar from the comfort of your home!
The best part about making your own vinegar is that it can save money in the long run; especially compared to store-bought varieties. With the right ingredients, you can also make sure that your vinegar is of superior quality and free from any artificial preservatives or flavors and it has positive benefits for gut health.
So why not give it a go? Who knows – you might even discover a new favorite condiment! Enjoy!
For info on how to make wine check here.
For info ob beginning fermentation for beginners check here.
For info on pickling click here.
Resource: https://www.ice.edu/blog/making-vinegars