What is Pressure Canning?
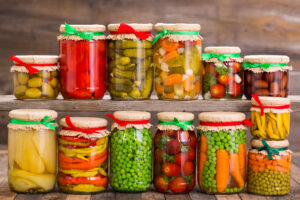
Pressure canning is a method of preserving food using a pressure canner in which the contents are heated and sealed within an airtight jar. The heat becomes high enough to kill bacteria, yeast, and molds. The airtight seal prevents microorganisms from entering and spoiling the preserved food. This provides you with shelf-stable food. In this article, we will discuss how to pressure can.
Why Should You Use Pressure Canning?
Pressure canning is an effective method for preserving a variety of foods including vegetables, fruits, meats, fish, and dairy products. It is also the only safe method for preserving low-acid foods like vegetables and meats since it kills any bacteria that could otherwise make people ill. Pressure canning is also a great way to store large batches of food for long-term storage, as it creates an airtight seal that prevents spoilage over time. It’s also a good way to pre-cook meals in a jar that you can then just open and serve. You have the added advantage of knowing where your food came from and what is in it.
How does a pressure canner work?
A pressure canner is a large pot that has an airtight lid with a valve to control the amount of pressure inside. The pot is filled with jars or cans containing food to be preserved and then heated on the stovetop. As the temperature of the water increases, so does the pressure inside the pot. This high-pressure steam can reach temperatures higher than boiling and kills any bacteria, yeasts, or molds present within the jar. You use the heat level of your stove-top to control the pressure.
What are the Parts of a Pressure Canner?
The parts of a pressure canner include the lid, which has a valve to regulate the pressure; the pot, which contains the jars or cans filled with food; two racks that hold the jars or cans in place; and an exhaust vent to allow steam to escape with a counterweight that sits on top of this. The lid also has an airtight seal to prevent any external contaminants from entering as it is heated. Finally, a gauge is used to measure the pressure inside the pot during canning.
What are some Tips for Successful Pressure Canning?
It’s important to follow instructions carefully when using a pressure canner as mistakes can be costly and dangerous. Before you begin, make sure that your jars or cans are properly prepared according to the manufacturer’s instructions. When using the canner, always make sure to keep an eye on the pressure gauge and adjust as necessary. It’s also important to allow enough time for cooling after canning is finished – this allows the jars or cans to seal properly and prevents spoilage. Finally, be aware that some foods require special processing times or pressures – sure to follow all instructions accordingly to ensure a safe and successful canning experience.
What are the Steps for Using a Pressure Canner?
The steps for using a pressure canner are as follows:
- Prepare the jars by cleaning them in hot soapy water, rinsing well, and then placing them in your water bath canner with the rack in the bottom. After filling the jars and pot with water until jars are covered with 2 inches of water, bring to a boil, and boil for 10 minutes. Keep the jars in simmering water until ready for use.
- Clean and prepare the food you plan to can. If hot packing you will bring the food to a simmer for 5 minutes and pack loosely into your jars
- Hot packing is the preferred method for most foods. When packing your jars you have to allow for the headspace recommended by your recipe. This will vary depending on what foods you are canning.
- Run a spatula around the outside of your jar once filled, to get rid of any air bubbles
- Wipe the rim of your jars with a clean cloth. Food residue can interfere with sealing.
- Place the lid and ring on your jars and finger tighten.
- Place the jars carefully into your pressure canner on the provided rack. The jars should not touch. The size of your canner will determine how many jars you can process at once. Read the instruction manual carefully.
- Put the pressure canner lid on with the vent port uncovered by the counterweight. Bring to a boil and let vent for 10 minutes through the uncovered venting port. Then place the counterweight on the venting port.
- Bring the pressure up to recommended level on the gauge and only then start your timing for processing. If for any reason canner loses pressure before completing you must start time over.
- Let the canner depressurize. This takes 30-45 minutes. In some canners, you will have a piston that drops to tell you when the process is complete.
- Once complete carefully open the lid facing away from you so the steam will not burn you
- Then lift the jar out with the appropriate tool and sit on a padded table to cool. Be careful as sometimes there is a suction that can cause water to splash on you. Not fun!
TIP’s for Pressure Canning
- Make sure to use the processing time recommended in your recipe and get your recipe from a trusted source.
- The altitude you are at affects the processing time. You have to allow for your altitude if above 1000 feet.
- The water and jars are very hot! Third-degree burn hot. I should know. Be very careful.
Conclusion
Pressure canning is an easy, safe way to preserve your food and store it for future use. It allows you to create shelf-stable versions of homemade preserves and pickles that are full of flavor and nutrients. Follow the instructions on how to pressure can carefully and you’ll be able to enjoy your canned goods for months or even years. Have fun!
Check information on water bath canning my article here.
For what NOT to can at home check here.
For free recipes and guides check this site: https://nchfp.uga.edu/publications/publications_usda.html#gsc.tab=0

