Fermentation is an ancient food preservation technique that is becoming increasingly popular today. The process of fermenting cabbage can help to increase its nutritional value while giving it a delicious flavor. It’s also an easy and inexpensive way to preserve cabbage for later use which has been used for hundreds of years in times when refrigeration was not an option. In this article, we’ll discuss the steps for safely fermenting cabbage at home.

Introduction
The process of fermentation involves the conversion of carbohydrates into acids, gases, or alcohols by microorganisms like yeast and bacteria. This method helps preserve food and creates new tastes and textures. By consuming fermented foods, one can benefit from probiotics and enzymes that promote improved digestion and good health. Fermenting cabbage preserves its nutrients and creates a distinct flavor.
Equipment for Fermenting
Fermenting cabbage at home requires a few specific pieces of equipment, including a knife, cutting board, colander, clean jars or containers with lids, and salt. A knife is needed to cut off the stem end of the cabbage and separate the leaves into smaller pieces. The cutting board provides a clean surface to work on and protect your countertop. A colander is used to rinse the cabbage under cold water before salting it and massaging the leaves. Clean jars or containers with lids are necessary for packing and fermenting the cabbage. Finally, salt is required to draw moisture out of the cabbage and start fermentation.
When it comes to fermenting cabbage, there are a few different types of salt that can be used. Sea salt is generally best since it doesn’t contain any additives like iodine or anti-caking agents. It also adds a slightly salty and briny flavor to the finished product. Kosher salt is another great choice as it also doesn’t contain any additives. However, it has a milder flavor than sea salt.
In addition to the basic equipment needed for fermenting cabbage, there are a few other pieces of equipment that can make the process even easier. Fermenting crocks are special ceramic or porcelain containers specifically designed for fermentation. They come with a water-filled moat around the top which helps create an airtight seal and keep oxygen out. Special weights can also be used to keep the cabbage submerged in the brine and help prevent mold from forming. Finally, there are pH test strips that allow you to test the acidity of your ferment before eating it. This article belongs to pineyriverhomestead.com Published 9-18-23
Mason jar fermenting lids are a great way to create an airtight seal for fermenting cabbage in mason jars. The lids come with an airlock that allows carbon dioxide to escape while keeping oxygen out, which is essential for successful fermentation. They also have self-locking tabs so the lid won’t pop off during the process. There are also more traditional ceramic crocks. In Korea when making Kimchi these would be buried in the fall to prevent freezing and keep a more constant temperature.
Step-by-Step Instructions for Safely Fermenting Cabbage at Home
Before you begin, make sure that all of your utensils. hands, and containers are clean. This will help to prevent contamination during the process.
1. Selecting and Preparing the Cabbage: Choose fresh, crisp cabbage heads that are free of blemishes or mold. Choose organic if you can. Remove any wilted or discolored leaves and discard them. Cut off the stem end and separate the leaves into small pieces before washing them in a colander with cold water. Allow them to drain thoroughly before proceeding.
2. Adding Salt and Massaging the Cabbage: Sprinkle a generous amount of salt over the cabbage leaves and massage them until they become slightly softer. The salt will help to draw out moisture, which is necessary for fermentation. Allow the cabbage to sit for 15 minutes before proceeding. This will pull liquid out of cabbage which will then serve as your brine. If there is not enough liquid to cover cabbage you will need to make a brine.
3. Packing the Cabbage: Place the salted and massaged cabbage in a clean jar or container with a lid. Compress the cabbage firmly with your hands to remove any air bubbles and ensure that it is tightly packed.
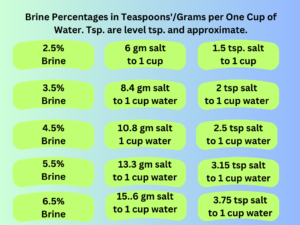
4. Adding Brine: Now add enough brine (salt water) to cover the cabbage completely, leaving at least 1-inch of headspace at the top of the jar or container. The ratio of salt to water is measured in percentage. Most vegetable are fermented in a 2.5% to 5% brine. This would be 1.5 to 3 level tsp. per cup of water dissolved. You may need to use warm water to get salt dissolved.
5. Using a starter: You can get starter culture online or you can add whey. It’s not necessary you do this but if you are new to fermentation it may be an easier way to get started.. You can easily get whey by straining plain yogurt in a strainer lined with cheese cloth or a coffee filter for several hours. The liquid that collects in the bowl beneath the strainer is whey. You can also use the liquid from a previous ferment to start a new one.

6. Fermenting: Place the lid on the jar or container and move it to a cool (65-75°F), dark place. Do not disturb the cabbage for at least 3 days, but check it regularly. When bubbles start appearing in the brine, you can begin tasting the cabbage. Make sure all of the cabbage is below the brine if you decide it needs a few more days to ferment. When it is done is a matter of taste. If it has the sourness you want, it is done and can be moved to fridge.
Troubleshooting Fermented Cabbage:
Troubleshooting fermented cabbage can be tricky, but there are a few key things to keep in mind.
Be sure your ferment is warm enough while fermenting. 65 to 70%
If you don’t see bubble by the end of three days, give it more time and check again. As long as it does not smell bad it is probably fine.
White kham yeast may form and that does not mean the ferment is bad. You can spoon it off and if some gets left, leave it. It won’t hurt you. Just sprinkle a little fresh salt on top or cover with brine. However, any other color of fuzzy critters is likely a sign something has gone wrong.
Fermented cabbage should smell and taste yeasty, sour and with a pleasant tang. If it’s mushy or smells bad to you don’t eat it.
Do not skimp on the salt in your recipe. The salty taste mellows as it sits in your fridge and if it is too salty you can rinse before eating. Although you may loose some of that probiotic goodness.
For a deeper dive into fermentation this book is the Bible on the subject to me:
Methods of Storing Fermented Cabbage
Once your cabbage is fermented to your liking, transfer it to a clean container and store it in the refrigerator. Fermented cabbage can last for up to 6 months when refrigerated properly.
Alternatively, when there was no refrigeration basements and root cellars were used as storage options.
Root cellars and basements are ideal storage options for fermented cabbage due to their ability to maintain cooler temperatures. This helps keep the cabbage fresh and prevents it from spoiling too quickly. Basements are also often more humid than other areas of the home, which can help to preserve the fermentation process and extend the shelf-life of the cabbage.
To store fermented cabbage in a basement or root cellar, first make sure the container it is stored in is airtight to prevent any moisture entering and spoiling the cabbage. Allow the cabbage to cool before transferring it into its storage location, as condensation can occur if it’s too warm when placed in cold temperatures. Finally, check on your cabbage regularly to make sure it is staying fresh. If any changes in appearance or smell are noticed, discard the cabbage immediately.
When storing fermented cabbage in a root cellar or basement, the ideal temperature is between 40-50°F. This range of temperatures helps slow down the fermentation process and maintains its freshness. To ensure optimal preservation, humidity levels should also remain steady at around 60-70%. This will help to keep moisture out and prevent mold or spoilage.
By storing your fermented cabbage in a refrigerator, basement or root cellar, you can ensure it stays fresh and delicious for as long as possible. Just remember to check on it regularly and discard any spoilage that may occur. With proper storage, you can enjoy the goodness of fermented cabbage for up to 6 months!
Safety Tips
To ensure safe fermentation, always make sure that your equipment and containers are clean and sterile. All vegetables should be washed thoroughly before use. Additionally, it is important to monitor the temperature of your ferment as too much heat can cause mold or spoilage. It is also essential to keep an eye on the headspace of your fermenting jar – make sure that there is always at least 1 inch of headspace left for the fermentation process. Finally, always taste test your fermented cabbage before storing it in the refrigerator to ensure that it has fermented to your liking.
By following these simple steps, you can safely ferment cabbage at home and enjoy its unique flavor and texture. With practice, you can even experiment with different spices or herbs to add extra flavor! Enjoy your homemade fermented cabbage!
Happy Fermenting! 🙂