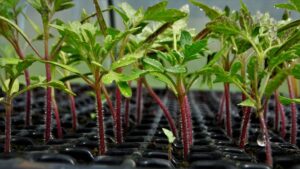
Seed starting is a rewarding endeavor. It gives you a head start on the growing season, allows for more variety in your garden, and can save money. Seed starting is an easy skill to learn and is outlined in this complete step-by-step guide.
Introduction
Seed starting, also known as sowing, is the process in which seeds are first planted with the purpose of germination. This initial crucial step in plant cultivation involves preparing suitable growing conditions for the seed, allowing it to sprout into a seedling. The process of seed starting can be undertaken directly in the soil (outdoors or in containers), or by using specialized indoor seed starting kits before transplanting them outdoors. Understanding and practicing effective seed-starting techniques can significantly enhance the growth and yield potential of the plants.
Importance of Seed Starting
Seed starting plays a pivotal role in the plant cultivation process. By controlling the initial environment in which the seed germinates, gardeners can significantly increase the likelihood of successful plant growth. Seed starting allows for an early start to the growing season, particularly in regions with colder climates. This is because seeds can be started indoors while outdoor conditions are still unsuitable for plant growth. Additionally, seed starting provides the opportunity to nurture rare, exotic, or delicate plants that might not typically survive in your local outdoor conditions. Ultimately, proper seed starting contributes to healthier plants, and better yield, and allows for a greater variety of plant species in your garden.
Seed Selection
Criteria for Selecting Seeds
When it comes to choosing seeds, there are several factors to consider to ensure successful germination and growth:
- Type of Plant: Choose seeds based on the types of plants you want to grow in your garden. You might opt for vegetables, herbs, flowers, or a mix of these. Each type of plant will have its own specific needs in terms of light, water, and soil conditions.
- Climate Compatibility: It’s essential to select seeds that suit your local climate conditions. Some plants thrive in colder climates, while others prefer warmer temperatures. Understanding your local climate and the growth cycle of plants can significantly impact your gardening success.
- Seed Viability: Seeds should be fresh for good germination rates. Over time, the germination rate of seeds decreases. Always check the packaging for the seed harvest date and try to use newer seeds when possible.
- Disease Resistance: Consider seeds that are labeled as disease-resistant. These varieties have been bred to resist certain common plant diseases, reducing the need for chemical treatments and increasing the chances of a healthy harvest.
- Non-GMO and Organic: If sustainability and health are your priorities, consider choosing seeds that are certified organic and non-GMO. These seeds come from plants that have been grown without the use of synthetic pesticides or genetically modified organisms.
Remember, choosing the right seeds is the first step in creating a flourishing garden. It’s worth spending some time researching and selecting the best seeds to suit your gardening needs and preferences.
Are there seeds that should not be started indoors?
Yes, there indeed are certain seeds that are better off not being started indoors. Some plants do not take well to the process of transplantation and prefer to start their growth cycle directly in the location where they will mature. Notably, root vegetables such as carrots, radishes, and turnips, as well as peas, beans, and sunflowers, are among the varieties that typically prefer to be directly sowed in their final growing location. These plants have sensitive root systems that can be disrupted by transplantation, potentially hindering their proper growth and development. Always remember to consult the seed packet or a trusted gardening guide for specific sowing recommendations.
Understanding Your Seed Packet Instructions
Seed packets are your primary source of information when choosing which seeds to plant. The front of a seed packet typically displays the plant’s name, variety and a photo or illustration of the mature plant. However, the real treasure trove is on the back where you find essential details about the seed.
- Sowing Instructions: This gives information about when to plant the seeds, the conditions they need to germinate, and the required spacing between each plant.
- Planting Depth: This refers to how deep the seeds should be sown into the soil. This is important, as planting too deep or too shallow could hinder the growth of the plant.
- Days to Maturity: This refers to the average number of days it takes for the plant to go from being planted to producing ripe fruit or flowers.
- Light Requirement: Some seeds need exposure to light for germination, while others prefer darkness. The packet will specify the plant’s light needs.
- Seed Viability and Harvest Date: Similar to what we discussed above, the packet will provide information about the seed’s harvest date and its expected viability.
Understanding your seed packets is crucial in making sure your garden thrives. So before you put those seeds into the soil, make sure to read the packets thoroughly.
Materials Needed for Seed Starting
Choosing the right seed-starting containers is an important step in your gardening journey. There are a variety of options available, each with its own set of advantages.
- Peat Pots: These are biodegradable pots made from compressed peat moss. They are great for plants that don’t like having their roots disturbed during transplantation, as you can plant the whole pot directly into the ground.
- Plastic Cell Packs: These are commonly used in greenhouses. They are durable, reusable, and come in a variety of sizes. However, they need to be sanitized between uses to prevent the spread of disease.
- Seed Starting Trays: These are large, flat trays divided into individual cells. They are perfect for starting a large number of seeds at once. Some come with a clear plastic dome to create a mini greenhouse effect.
- Recycled Containers: Items such as egg cartons, yogurt cups, or toilet paper rolls can be used as seed starting containers. Just make sure to poke holes in the bottom for drainage.
Remember to choose a container that suits the needs of your seeds and the space you have available.
Seed Starting Mix: How to Choose a Growing Medium
Choosing the right soil is crucial for seed starting. Regular garden soil is often too dense for delicate seedlings. A good seed starting mix is light and fluffy, providing the seeds with the perfect environment for germination. It should retain just enough water to keep the seeds moist but also allow for adequate drainage. You can purchase premade mixes or make your own by combining equal parts peat moss or coconut coir, vermiculite or perlite, and compost. Some gardeners also choose to sterilize their mix to kill any pathogens that could harm the seedlings. Remember, your tiny seeds have all the energy they need to germinate and start growing, but the right seed starting mix can give them the best possible start in life.
Sterilizing Your Growing Medium: A Necessary Step?
To sterilize your seed starting mix, you can bake it in the oven. Place your growing medium in a baking dish, moisten it slightly, and then cover it with aluminum foil. Bake at 180-200°F (82-93°C) for about 30 minutes. Allow it to cool completely before using.
Now, you might ask, “Is this step really necessary?” The answer depends on several factors. Sterilizing your growing medium can help to kill any harmful pathogens, weed seeds, or pests that might be present, which can give your seedlings a better start. However, this process can also kill beneficial organisms and alter soil structure. If you are using a high-quality, commercially prepared seed starting mix, sterilization may not be necessary as these mixes are usually clean and virtually free from harmful elements. On the other hand, if you’re using homemade compost or recycled containers, sterilization could be a wise precaution to ensure the health of your seedlings. It’s really a balance between the potential risks and benefits.
Grow Lights:
The role of grow lights in seed starting can’t be overstated. These lights simulate natural sunlight, which is vital for seedlings’ photosynthesis process. Grow lights offer a controlled source of light, enabling you to grow seeds regardless of weather patterns or available natural light in your space. There are several types of grow lights available, including fluorescent lights, LED lights, and high-intensity discharge lights. Fluorescent and LED lights are usually the best options for seed starting due to their low heat output, energy efficiency, and full-spectrum light that covers all the light spectrum necessary for plants. Remember, your seedlings need 12-16 hours of light each day, so using a timer can be quite helpful.
The Seed Starting Process
Preparing the Seeds
Proper seed preparation is an essential step in the seed-starting process. Begin by selecting high-quality seeds from a reputable supplier to ensure they are disease-free and have a good germination rate. Look at the seed packet for crucial information like the plant variety, planting depth, and germination time. Before sowing, some seeds may require specific treatments to aid germination, such as scarification (scratching the seed coat) or stratification (exposing seeds to cold temperatures to mimic winter conditions). Always ensure you handle seeds with clean hands and tools to avoid introducing any pathogens.
Should you soak your seeds in water before planting and if so, for how long?
Soaking seeds before planting is a common practice that can help accelerate the germination process. Some experts recommend soaking seeds for 12-24 hours before sowing, while others believe it’s unnecessary or even harmful to certain seeds. It’s best to research specific seed types and their preferences before deciding whether or not to soak them. For example, some hard-coated seeds like morning glories and marigolds benefit from soaking, while delicate seeds like petunias can be damaged by extended exposure to water.
Should soaking seeds float or sink?
When soaking seeds, some may float to the surface while others may sink to the bottom. It’s commonly thought the floating seeds are not viable however, other schools of thought say this is completely normal and does not indicate whether the seeds are viable or not. Floating seeds do not necessarily mean they will not germinate, so it’s best to refer to seed-specific recommendations for successful germination.
Choosing the Right Growing Medium
The growing medium, or soil, is a crucial factor in the success of your seedlings. It should provide adequate nutrients, retain moisture well, and have good drainage. You can purchase pre-made
Should you soak your seeds in a bleach solution?
The decision to soak seeds in a bleach solution before planting is controversial. While some gardeners swear by this method to prevent seedling diseases, others argue that it can also harm beneficial microorganisms in the soil and potentially damage the seeds themselves. It’s essential to research and weigh the potential risks and benefits before deciding whether or not to use this method.
Planting the Seeds
Once prepared, seeds can be sown into the seed starting mix. Make sure to plant them at the correct depth — usually two times the width of the seed. After sowing, gently water the seeds. Cover the trays with a plastic dome or wrap to create a humid environment that encourages germination. Finally, place the trays under your grow lights, set your timer, and await the emergence of your new seedlings.
Watering and Lighting the Seedlings
Proper watering and lighting are crucial for the growth and development of your seedlings. When it comes to watering, it’s important to maintain a balance — overwatering can lead to diseases like damping-off while underwatering can stress the plants. Always aim to keep the soil moist, not soggy. It’s best to water from the bottom, which encourages the roots to grow downwards and become strong.
Lighting, on the other hand, plays a vital role in photosynthesis, the process through which plants derive energy for growth. As mentioned earlier, seedlings require 12-16 hours of light each day. However, avoid the temptation to provide 24 hours of light, as seedlings also need periods of darkness to rest and develop properly. Make sure the lights are close enough to the seedlings (usually 2-4 inches above) to prevent them from becoming ‘leggy’ — growing tall and spindly due to stretching for light. Lastly, remember to adjust the height of the lights as your seedlings grow to prevent them from touching the bulbs.
Temperature Control
Maintaining the correct temperature is another key aspect of successful seed germination and seedling development. Most seeds germinate best at temperatures between 65-75 degrees Fahrenheit (18-24 degrees Celsius). During the seedling stage, cool-season crops like lettuce and broccoli prefer temperatures between 60-70 degrees Fahrenheit (15-21 degrees Celsius), while warm-season crops such as tomatoes and peppers prefer slightly warmer conditions, between 70-80 degrees Fahrenheit (21-27 degrees Celsius). Monitoring the temperature within your growing environment can be achieved using a simple indoor thermometer. Remember, sudden or extreme temperature changes can stress your seedlings, potentially impeding their growth or even causing them to wilt and die. Therefore, strive for consistent temperature control to ensure the health and vitality of your young plants.
Transplanting and Hardening-off
Transplanting Seedlings
Transplanting refers to the process of moving a plant from one location to another. When it comes to seedlings, this usually means moving them from a small starter pot to a larger pot or directly into the garden. The best time to transplant seedlings is after they’ve developed their second set of true leaves, a stage known as the ‘two-leaf stage’.
To transplant, begin by watering your seedlings well, then gently loosen the soil around the roots with a small tool or your fingers. Hold the seedling by its leaves (not the stem) to avoid damaging the plant. Make a hole in the new pot or garden bed, place the seedling in, and cover with soil, patting gently to ensure there are no air pockets. Make sure not to plant the seedling deeper than it was in its previous pot. After transplanting, water the seedlings gently but thoroughly.
Hardening-off Seedlings
Before transplanting seedlings outdoors, they need to go through a process called ‘hardening off’. This refers to gradually acclimatizing indoor-started seedlings to outdoor conditions like wind, sun and temperature fluctuations. Start by placing your seedlings outside in a sheltered location for a few hours during the cooler part of the day, gradually increasing the amount of time and sunlight exposure over a period of one to two weeks. This careful process will prepare your seedlings for their final transition to being outdoors full-time, and help them to thrive in their new environment.
The Process of Hardening-Off
Hardening-off is a systematic and meticulous process that requires careful attention and patience. Start by exposing the seedlings to the outdoor environment for just one to two hours, ensuring they are in a shaded and wind-protected location. Over the next week, gradually increase the amount of time they spend outdoors by an extra hour each day. Simultaneously, you can slowly start introducing them to more sunlight and less protected areas. It’s important to monitor the weather during this process. Avoid exposing seedlings to extreme temperatures or conditions. If the forecast predicts strong winds or a late frost, it’s better to keep the seedlings indoors for that day. Also, remember to cut back on watering and stop fertilizing during this period. After one to two weeks, depending on the hardiness of the seedlings and the weather conditions, the plants should be ready to withstand being outdoors full-time. After this, they can be safely transplanted into the garden.
Common Problems and Solutions
While hardening off is an essential step in preparing your seedlings for the outdoors, gardeners often encounter a few common problems during the process. Here are some solutions to address them:
- Wilting or Drooping Seedlings: This could be due to overexposure to the sun or wind too early. Remedy this by reducing the duration of exposure and providing more shelter. If the problem persists, increase their water intake.
- Leaf Scorch or Discoloration: This is often a sign of sunburn. If this occurs, move your seedlings back into the shade and gradually reintroduce them to sunlight, limiting exposure time.
- Seedlings not Growing: If your seedlings are not growing during the hardening-off process, they may be getting too much or too little water. Adjust watering accordingly and ensure the seedlings aren’t exposed to extreme temperatures.
Always remember, the hardening-off process is a gentle transition and rushing it can lead to plant stress. It’s important to closely observe your seedlings throughout the process and make necessary adjustments to ensure a successful transplantation.
Damping-off Disease
Damping-off is a common and lethal disease that affects seedlings, causing them to rot at the soil surface level or fall over due to a weakened stem. This disease is usually caused by a variety of soilborne fungi such as Pythium, Rhizoctonia, or Fusarium. These fungi thrive in conditions of high humidity and poor air circulation. To prevent damping-off, it’s crucial to use well-draining soil, avoid overwatering, and ensure adequate spacing between your seedlings for proper air circulation. If the disease occurs, remove and discard infected plants immediately to prevent the disease from spreading. Fungicides can also be used as a preventive measure, but they are usually not effective once the disease has taken hold. To use fungicides, follow the manufacturer’s instructions carefully.
Leggy Seedlings
Leggy seedlings, characterized by their long, thin stems and sparse leaves, are a common challenge for gardeners. This condition usually arises from insufficient light, causing the seedlings to stretch towards the light source and grow taller rather than bushier. Leggy seedlings are weak, with a higher risk of damage during transplanting. If you notice this condition, it’s important to provide more light to your plants either by placing them closer to a natural light source or by using artificial grow lights. Rotating your plants can also ensure even light distribution. Additionally, repotting leggy seedlings deeper into the soil can help support the stem and encourage root growth along the buried portion of the stem. With the right adjustment of light and care, your leggy seedlings can grow into healthy, robust plants.
Mold and Fungus
Mold and fungus can be detrimental to plant health, often caused by damp conditions and poor air circulation. Common types include Botrytis (grey mold), Sclerotinia (white mold), and various types of mildew. These invaders can manifest in multiple ways, such as spots on leaves, fuzzy growths, or a sickly color change in your plants. To prevent mold and fungus, minimize leaf wetness by watering at the soil level, increase air circulation around your plants, use disease-resistant plant varieties, and regularly clean and disinfect your gardening tools. If you notice signs of mold or fungus, isolate the affected plants to avoid spreading spores. Treatment options include fungicides and organic solutions, like a diluted vinegar spray or a baking soda solution. Always follow the manufacturer’s instructions for any treatments. With diligent care and attention, these common gardening foes can be managed effectively.
Disinfecting Garden Tools and Reusable Pots
Keeping your garden tools and reusable pots clean and disinfected is crucial to preventing the spread of disease in your garden. Begin by removing any visible dirt from your tools and pots. Warm soapy water and a scrubbing brush can be used to clean off stubborn dirt.
Once they are clean, disinfect your tools and pots to kill any lingering pathogens. Household bleach can be an effective disinfectant. Prepare a solution of one part bleach to nine parts water. Soak your tools and pots in this solution for approximately 10 minutes, then rinse with clean water and allow to dry thoroughly before reuse.
For tools with wooden handles or for materials that might be damaged by bleach, a rubbing alcohol or hydrogen peroxide solution can be used instead. Simply wipe down the tools with a cloth soaked in the solution and allow them to air dry.
Remember, it’s important to clean and disinfect your tools and pots regularly, especially when moving between different plants, to prevent cross-contamination. Following these simple steps can help ensure the health and longevity of your garden.
Conclusion
In conclusion, maintaining a healthy garden is a multifaceted endeavor that goes beyond basic watering and weeding. The prevention and management of harmful pests and diseases, coupled with regular disinfection of garden tools and pots, is essential for a thriving garden. Implementing these preventative measures and solutions can vastly improve the health and vitality of your plants. Remember, a little effort goes a long way in fostering a vibrant, blooming garden. Happy gardening!