Introduction
I am by no means a spring chicken. So. as I go about trying to learn to grow more of my own food, I am also looking for ways that are easy for people who are older like me. Add to that my property mostly grows rocks and straw bale gardening seemed worth a look.
Why do Straw Bale Gardening?
Straw bale gardening is a gardening method that allows you to grow plants in a cost-effective, and space-efficient manner. Whether you have limited garden space, poor soil quality, or want to explore an alternative gardening approach, straw bale gardening offers numerous advantages. In this comprehensive guide, we’ll cover everything you need to know about straw bale gardening, from selecting the right straw to determining when the bales are ready for planting.
Straw Bale Gardening for Beginners
Straw bale gardening involves using straw bales as the primary planting medium. The straw acts as a container, support, and a source of nutrients as it decomposes over time. This method eliminates the need for traditional soil and allows for greater control over the growing environment.
To set up a successful straw bale garden, choose straw bales made from clean, weed-free straw. Wheat, barley, or oat straw are commonly used for straw bale gardening. Ensure that the straw does not contain herbicides or pesticides that can harm your plants.
Selecting the right straw
When embarking on straw bale gardening, it is crucial to choose the right type of straw. Wheat straw, barley straw, or oat straw are commonly used and are easily available at local garden centers, nurseries, or farm supply stores.
Setting up the Bales
Place the straw bales in a location that receives at least six to eight hours of sunlight per day. Position them with the cut side up, which provides stability, aids in water retention, and allows plant roots to access the nutrient-rich interior. To determine the cut side, examine the bale carefully. Typically, one side of the bale will have clean, straight cuts where the straw was harvested. This side should be facing up. The other side will be folded not cut. Do this before they get wet from rain as wet straw bales are heavy!
Aging the Bales
Aging the bales is a crucial step to prepare them for planting. Begin by thoroughly wetting the bales and keeping them consistently moist for about two weeks. During this period, the bales will undergo a heating process as the straw decomposes.
Heating Process and Determining Readiness for Planting
During the aging process of straw bales, a natural heating process occurs as the straw begins to decompose. This heating process is a crucial step in preparing the bales for planting and creating an optimal environment for your crops. Here’s an overview of the heating process and how to determine when the bales are ready for planting:
- Initial Moistening: Begin by thoroughly wetting the straw bales to initiate the decomposition process. Keep the bales consistently moist during the initial two-week period.
- Temperature Rise: As the decomposition progresses, the microorganisms responsible for breaking down the straw generate heat. You may notice the bales becoming warm to the touch. This rise in temperature is an indication that the decomposition process is underway.
- Monitoring the Temperature: To monitor the heating process, use a thermometer inserted into the center of the bales. The temperature should be measured daily for the first week or two. Typically, the temperature will gradually increase during this period.
- Peak Heating: The temperature inside the bales will continue to rise until it reaches a peak, typically ranging from 100 to 130 degrees Fahrenheit (38 to 54 degrees Celsius). This peak heating indicates that the decomposition is progressing and breaking down the straw.
- Cooling Phase: After reaching the peak temperature, the bales will start to cool down gradually. This cooling phase signifies that the decomposition process is nearing completion.
- Ready for Planting: When the bales have cooled down and the internal temperature has stabilized close to the ambient temperature, they are ready for planting. This usually occurs after approximately two to three weeks of aging.
To determine the readiness for planting, consider the following indicators:
- Temperature Stabilization: The internal temperature of the bales should no longer be significantly higher than the surrounding environment, indicating that the decomposition has subsided.
- Straw Decomposition: The straw should appear partially broken down, becoming softer and starting to resemble a dark, crumbly material. You can test this by pressing your hand into the bale. It should offer some resistance but still break apart easily.
Planting the Bales
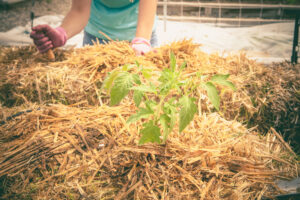
Once the bales have cooled down and the straw has decomposed to a suitable extent, they are ready for planting. Create planting pockets on top of the bales by removing some straw and filling the gaps with potting soil or compost. Plant your desired crops and ensure proper irrigation and care throughout the growing season.
The aging process of straw bales involves a heating phase where the decomposition of the straw generates heat, which can kill weed seeds. However, some weeds may still emerge. Regularly inspect the bales and remove any weeds promptly. Some people solarize their bales before planting to kill any weed seeds in the bales. Monitoring the temperature and observing the cooling phase will help determine when the bales are ready for planting.
Once the bales have cooled down, the straw has partially decomposed, and the temperature has stabilized, they are suitable for planting your chosen crops.
For an example of how many plants to plant per bale see the table below:
| PLANTS | NUMBER OF PLANTS PER BALE |
| Tomatoes | 3-4 plants per bale |
| Cucumbers | 3-4 plants per bale |
| Squash (summer) | 2-3 plants per bale |
| Squash (winter) | 2 plants per bale |
Amendments and Fertilizers
To enhance the nutrient content of the straw bales, incorporate organic amendments such as compost, aged manure, or organic fertilizers. These amendments provide essential nutrients for plant growth and promote healthy root development.
Fertilize the straw bales every two to three weeks using water-soluble or organic fertilizers. These will provide the necessary nutrients to support plant growth and development. Any balanced fertilizer can be used,
Watering
Straw bale gardens require regular watering, especially during the initial stages when the bales are still decomposing. Straw bales have excellent water retention properties, but they also require regular irrigation. Monitor the moisture level and ensure the bales are consistently moist, but not waterlogged. Water deeply and thoroughly, allowing the water to penetrate the bales. The bales should be kept consistently moist, but not overly saturated, to prevent rot. Depending on the weather conditions and plant requirements, water the bales daily.
Longevity of Straw Bales
Straw bales can be used for multiple years if properly maintained and rejuvenated. Over time, the bales will break down and lose their structural integrity. To extend their usability, replenish the nutrients by adding compost, aged manure, or organic fertilizers. Monitor the condition of the bales and replace them when they become too deteriorated. To further stabilize the bales and facilitate composting, consider surrounding them with frames made of chicken wire or wood. These frames provide support, prevent the bales from spreading apart, and create a contained area where the straw can decompose into nutrient-rich soil.
With the right framing you could just keep adding straw bales every two years or so and you would end up with rich soil in your frames over time.
Ideal Crops for Straw Bale Gardens:
Straw bale gardening provides a versatile growing environment that can support a wide variety of plants. While many crops can thrive in straw bales, some are particularly well-suited to this unique gardening method. Here are some crops that tend to perform exceptionally well in straw bale gardens:
- Tomatoes: Tomatoes are one of the most popular choices for straw bale gardening. The warm, well-drained environment of the bales promotes healthy root development and helps prevent common soil-borne diseases. Indeterminate tomato varieties, which continue to grow and produce fruit throughout the season, are particularly well-suited for trellising or staking on the bales. Your stakes will need to go into the ground as the bale itself will be breaking down. Also a shorter variety is best.
- Peppers: Peppers, including bell peppers and chili peppers, also thrive in straw bale gardens. They enjoy the warmth provided by the decomposing straw and benefit from the excellent drainage. Peppers can be planted directly into the top of the bales and typically produce abundant yields.
- Cucumbers: Cucumbers are well-suited for straw bale gardening, especially vining varieties. The bales provide excellent support for the sprawling vines, and the warm environment promotes healthy growth and high yields. Consider trellising the cucumber plants to maximize space and airflow.
- Squash and Zucchini: Summer squash and zucchini are ideal crops for straw bale gardening. These plants appreciate the nutrient-rich environment created by the decomposing straw. Ensure adequate space for the sprawling vines or provide trellises for vertical growth.
- Herbs: Many herbs thrive in straw bales, making them a convenient choice for culinary enthusiasts. Basil, parsley, cilantro, rosemary, and thyme are just a few examples of herbs that can be grown successfully in straw bale gardens. Plant herbs directly into the bales or use small containers on top of the bales for easy access.
- Leafy Greens: Leafy greens, such as lettuce, spinach, and kale, are well-suited for straw bale gardens. The loose, well-drained structure of the bales ensures proper root development and reduces the risk of disease. These crops can be planted directly into the top of the bales or in containers placed on the bales.
- Strawberries: Straw bale gardens provide an excellent growing environment for strawberries. Planting strawberry plants directly into the sides of the bales allows their runners to cascade down, making for a visually appealing and productive strawberry patch.
- Flowers: Straw bale gardens can also be used to grow a wide variety of flowers, adding beauty and color to your garden. Marigolds, sunflowers, zinnias, and nasturtiums are some examples of flowers that thrive in straw bales.
Remember to consider the specific needs of each plant, such as sunlight requirements and spacing, when planning your straw bale garden. Experimenting with different crops can help you discover which plants are particularly well-suited to your specific climate and growing conditions.
If you are interested in expanding your backyard self-sufficiency check out this book. This is an affiliate link which just means if you decide to buy it I get a commission.
Estimated Cost of Setting up a Straw Bale Garden: ‘
The cost of straw bales will vary depending on your location and availability.
- a) On average, a single straw bale can range from $5 to $10. Consider shopping around at local garden centers, farm supply stores, or contacting local farmers to find the best prices.
- b) Amendments and Fertilizers: While the initial cost of amendments and fertilizers will vary based on the size of your garden and the specific products you choose, expect to allocate a budget for organic fertilizers, compost, or other soil amendments. These costs can range from $20 to $50, depending on the size of your garden and the quality of the products.
- c) Frames or Supports: If you choose to surround your bales with frames or supports made of chicken wire or wood, there will be an additional cost involved. Chicken wire can cost around $10 to $20 per roll, depending on the length and quality. Building a wooden frame may require purchasing lumber and fasteners, which could cost $20 to $50, depending on the size and design of the frame.
- d) Planting Materials: The cost of seeds or seedlings will vary based on the plants you choose to grow in your straw bale garden. Consider your desired variety and the specific requirements of the plants. Seeds generally have a lower cost, while established seedlings may require a slightly higher investment.
- e) Tools and Equipment: Straw bale gardening typically requires basic gardening tools such as a hand trowel, watering can or hose, and pruning shears. If you don’t already have these tools, factor in their cost when estimating the overall budget. However, the cost of tools and equipment is generally not significant since straw bale gardening is relatively low maintenance.
- This article belong to pineyriverhomestead.com published 10-5-23
It’s important to note that the estimated costs provided here are approximate and can vary depending on location, availability, and personal preferences. It’s recommended to plan your budget accordingly and shop around for the best prices and deals in your area.
Conclusion:
Straw bale gardening offers a way to grow plants, even in challenging gardening conditions. By following the techniques and best practices outlined in this comprehensive guide, you can set up a thriving straw bale garden. Remember to select high-quality straw, age the bales properly, amend the straw with organic materials, and provide adequate water and nutrients. Experiment with various crops and enjoy the abundant harvests that straw bale gardening can bring. Embrace this innovative gardening method and unlock the potential of growing your own plants with straw bales.
For more on no dig gardening click here.
For more on another great no dig method lasagna gardening