Introduction
Composting is a process of decomposing organic matter to create nutrient-rich soil. There are two main methods of composting: hot and cold composting. The difference between hot and cold composting is primarily time and effort. Read on for more information!
Difference Between Hot and Cold Composting
Hot Composting:
Hot composting involves the use of high temperatures (55°C/131°F or higher) to rapidly break down the material into compost within weeks or days. This requires a higher ratio of nitrogen to carbon, 15 parts carbon to one part nitrogen.
There are several varying opinions on the correct ratio but too much nitrogen will cause an ammonia smell and indicate you are losing nitrogen. Some sources say a 50/50 ratio is just fine. I once had a pile of just leaves on my concrete patio turn into dirt without my ever doing anything to them. I wasn’t into raking! It did take a year or so, but still.
If the compost heap is built correctly it should heat up within 36 hours. The high temperatures kill pathogens and weed seeds. Material decomposes quickly due to the high temperatures which can be achieved through careful management of oxygen and moisture by watering and turning or aerating pile.
You need a compost thermometer for this method. If the temperature exceeds 160°F add water and carbon material(browns) and turn pile. If it falls below 131°F add water and nitrogen waste(greens) to bring the temperature up as nitrogen decomposition adds the microorganisms needed to heat up the pile.
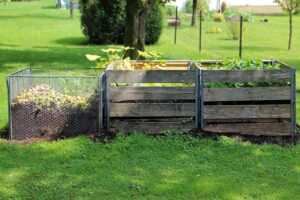
Hot composting is typically undertaken in a contained environment such as a bin or compost heap and requires frequent turning and moistening for optimal results. It is more labor intensive but provides useable compost in 4-6 weeks. (Some resources say as soon as 2 to 3 weeks) Additionally, it kills weed seeds and unwanted pathogens such as diseases on your plants if you keep the temperature high enough.
In hot composting, it is recommended the pile be at least 4 feet high and wide. This would require collecting a good deal of material before starting.
Cold Composting:
Involves the use of ambient temperatures (15°C or lower 59°F) to decompose the material over a period of several years. But who’s in a hurry! You are still doing something positive with all your yard and kitchen waste and eventually getting black gold out of it. it is more a set-and-forget-it style. You try to keep a 2:1 ratio of carbon to nitrogen but 1:1 will work fine.
The process is slower and involves fewer steps than hot composting, but can still produce good-quality compost.
It is suitable for larger amounts of material, such as garden waste, and does not require frequent turning or moistening.
How to Hot Compost
Step 1: Gather Materials – Collect all your organic waste material such as vegetable peelings, eggshells, coffee grounds and grass clippings. Chop or shred larger pieces of material to speed up the composting process.
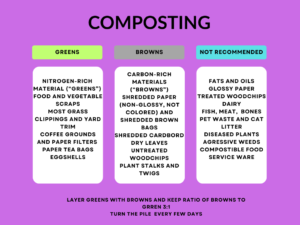
Step 2: Create Compost Heap – Build a compost heap by alternating layers of “greens” (high nitrogen materials such as grass clippings or vegetable peelings) and “browns” (high carbon materials such as dried leaves, twigs or paper). Sprinkle a thin layer of soil between each layer to introduce beneficial microorganisms. Aim for a ratio of at least 15:1 browns to greens.
Step 3: Add Moisture – Water the compost heap regularly to keep it moist but not soggy. A good rule of thumb is to aim for a damp sponge when squeezing the material in your hand.
Step 4: Maintain Temperature – Monitor the temperature of your compost heap with a thermometer. The ideal temperature range for hot composting is between 55°C and 65°C. (131F° to 149°F) If the temperature is too low, add more nitrogen-rich(Greens) materials or turn the heap to aerate it. If the temperature gets too high, add some carbon-rich material(Browns) or dampen down with water.
Step 5: Monitor Moisture – Hot composting requires sufficient moisture for the microorganisms to work effectively. Your compost should be moist but not soggy, about as damp as a wrung-out sponge. Add more water if needed and turn the heap to aerate it.
Step 6: Turn Compost – Turn your compost heap regularly to ensure sufficient oxygen is available for the decomposition process. This will also help maintain the temperature and keep a good balance of nitrogen and carbon. How often to turn the compost depends on how often you are adding new material to the pile but on average turn your compost pile when hot composting every two weeks.
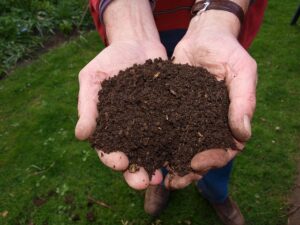
Step 7: Monitor Progress – Record the temperature of your compost heap each time you turn it. The compost should be ready in around four to six weeks. Your compost is ready for harvest when it has cooled down and turned an earthy brown color. the material should be dark brown, crumbly and have an earthy smell. Use a Garden Fork to remove the compost from the bottom or side of your heap. Sift out any large chunks before using the compost in your garden.
Some sources recommend you age your hot compost from 6 months to 2 years. It definitely should not be hot or smelly when you use it. You can measure the pH which should be between 6-8 as a test before using too.
Once the material has decomposed and looks like fine soil, it is ready to be harvested. Unfinished compost can be added back to the heap as well as used in gardens and planters. Finished compost should be stored in a dry location until needed.
Here’s an example of a composter on Amazon:
Dual Chamber Compost Tumbler – Easy-Turn, Fast-Working System
How to Cold Compost
Step 1: Start Your Compost Pile – Collect organic materials such as grass clippings, vegetable and fruit scraps, tea bags, coffee grounds, egg shells and shredded newspaper for your compost pile. Mix in some soil or mature compost to introduce beneficial microorganisms. If you have animals, you can also add their manure as long as it is well-rotted first. Things like chicken or rabbit bedding can be added here or if you have livestock manure can be added
Step 2: Add Layers – The pile can be any size. Build your pile in layers alternating between green materials (nitrogen-rich) and brown materials (carbon-rich). This will help to maintain an aerobic environment as the material decomposes so that beneficial bacteria and fungi can flourish. What ratio of greens to browns should you use? A good rule of thumb is “three parts browns to one part greens”, but if you end up with 1:1 it will still break down. It will take longer and it might get smelly but if that happens just add more browns. Also don’t use weeds gone to seed or diseased plants as cold composting won’t kill them and you can spread them around when you use it. Better to burn these.
Step 3: Aeration – You will need to turn the compost pile every two or three weeks. This is called aerating and it helps to provide oxygen which speeds up decomposition. A pitchfork or spade works well for this job. (But I admit, I never turned those leaves on my patio!)
Step 4: Monitor Temperature – Cold composting doesn’t require the same high temperatures as hot composting since it is done at a slower rate. You don’t want your pile to get too cold, so monitor the internal temperature of your pile with a thermometer and add extra layers if necessary.
Step 5: Keep It Moist – Cold composting requires sufficient moisture for the microorganisms to work effectively. Your pile should be as moist as a wrung-out sponge. You may need to water the compost every now and then, depending on how much moisture is available in the materials you have used. You don’t want it over wet.
Step 6: Use It When Ready – When the compost is ready, you’ll notice a pleasant earthy smell. Sift out any large chunks before using the compost in your garden. Cold composting typically takes many months to years whereas hot composting can be done in a few weeks.
Conclusion:
Hot composting is labor intensive but produces compost faster. If done right it will kill pathogens and weed seeds. If you are in a hurry this is your method. Cold composting takes much longer but is also less work. However, it does not kill weed seeds or pathogens. I just keep remembering all that beautiful rich dirt on my patio that I did absolutely nothing to make but neglect my raking duties! In the end, there is no wrong way to compost and any attempt will eventually give you black gold(Have you seen the cost of compost? Ridiculous!) and have the added benefit of decreasing the landfill load.
Check out my post How to Start Composting at Home for a quick guide;
References:
https://www.treehugger.com/cold-composting-step-by-step-guide-5186100